¶ 1.Z-axis threaded rod
¶ 1)Background
During the use of Kobra 2 Neo, if you hear abnormal noises during the operation of the Z-axis threaded rod, it may indicate a maintenance issue.
¶ 2)How to Determine if Maintenance is Needed
Generally, the Z-axis threaded rod should be maintained regularly, approximately every 3 months. If you hear unusual noise or sounds when moving the Z-axis, it is an indication that the Z-axis threaded rod needs maintenance.
¶ 3)How to Maintain the Z-axis threaded rod
¶ Tips:
Avoid using lubricating oil as it can flow into the motor and damage its internal structure.
¶ Step 1: Cleaning the threaded rod
Use a lint-free cloth to clean the Z-axis threaded rod, ensuring that its surface is smooth and free of dust or debris.
¶ Step 2: Zeroing the Z-Axis
Connect the power supply.
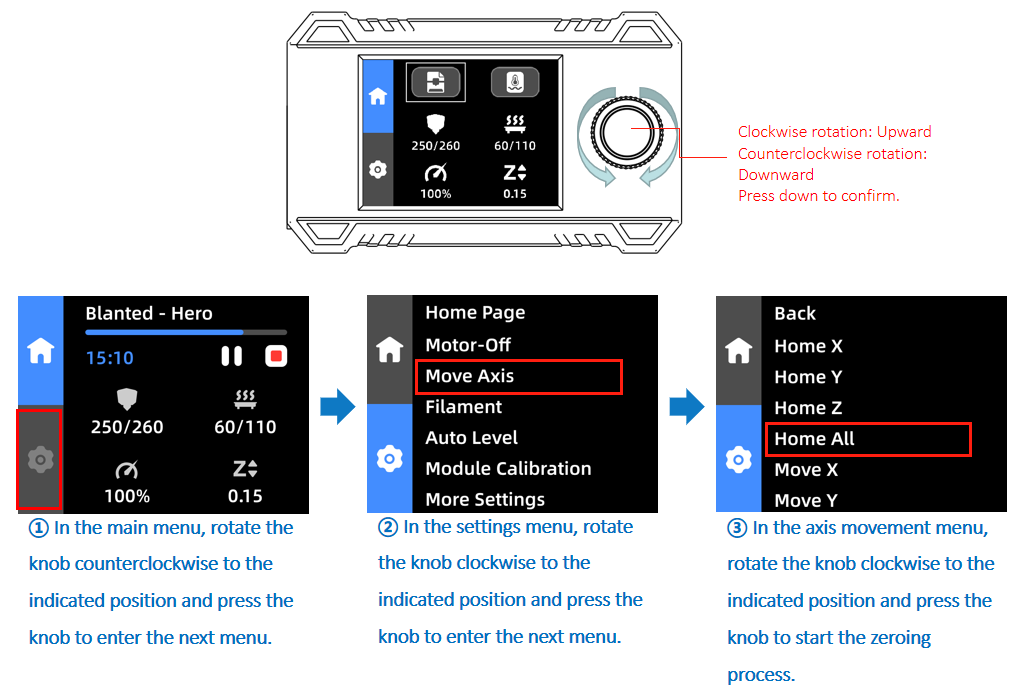
① In the main menu, rotate the knob counterclockwise to the indicated position and press the knob to enter the next menu.
② In the settings menu, rotate the knob clockwise to the indicated position and press the knob to enter the next menu.
③ In the axis movement menu, rotate the knob clockwise to the indicated position and press the knob to start the zeroing process.

¶ Step 3: Lubricating the threaded rod
① Apply a small amount of lubricating grease along the height of the Z-axis threaded rod, ensuring even distribution on its surface.
② Select "Move Z" to enter the Z-axis movement menu. Rotate the knob clockwise to adjust the value to "250mm" to raise the Z-axis to its highest position.
③ Apply a small amount of lubricating grease again to the surface of the Z-axis threaded rod.
④ In the previous axis movement menu, press the knob to return. Rotate the knob to the "Home Z" or "Home All" option and press the knob to make the threaded rod move back and forth, ensuring smooth coverage of the entire threaded rod surface with the lubricating grease.
⑤ Finally, use a lint-free cloth to wipe off any excess lubricating grease.

¶ Step 4: Testing
After lubrication, perform some test prints to ensure smooth Z-axis movement without any abnormal noise.
¶ 2.V-Type Pulley
¶ 1)Background
The Kobra 2 Neo X/Y/Z axes use a V-type pulley motion structure. If the V-type pulley is damaged, it can affect print quality.
¶ 2)How to Determine if Maintenance is Needed
It is recommended to check the wear and tear of the Z-axis V-type pulley every month and replace it as necessary. This helps maintain the normal operation of the pulley and ensures the stability and accuracy of the printer.
¶ 3)How to Maintain the V-Type Pulley
Turn off the machine and disconnect the power. Check the surface of the V-type pulley for any obvious signs of wear, such as scratches, deformation, or damage. If severe wear is found, the pulley needs to be replaced.
¶ 3.Nozzle
¶ 1)Issue Background
During the printing process, melted filament is extruded through the nozzle. When the material cools and solidifies at the nozzle, it can cause clogging. This is often due to unsuitable temperature or printing speed, which can affect the printing process and quality.
¶ 2)How to Determine if Maintenance is Needed
It is recommended to check the extrusion of the nozzle monthly. If you encounter any of the following situations, it is advisable to perform maintenance on the nozzle:
1.Small or uneven extrusion.
2.Nozzle clogging, preventing normal printing.
3.Leakage from the nozzle.
¶ 3)How to Maintain the Nozzle
Required tools:
Needle, tweezers.
¶ Tips:
When using a needle to clear the nozzle, be cautious as the melted filament can come into direct contact with the needle and your hands, which may cause burns. When switching to a different type of filament, ensure that the previous filament is completely extruded.
For example, if you initially printed with ABS material at 240°C and then switch to PLA material at 190°C, there may be some remaining ABS material that requires a higher temperature to melt in the nozzle throat, resulting in clogging when printing PLA material.
After replacing the filament, set the nozzle temperature to 250°C and click "Extrude". Wait for three minutes to ensure that the new filament completely replaces any residue in the nozzle throat.
¶ Step 1: Raise the Z-Axis
Connect the power supply.
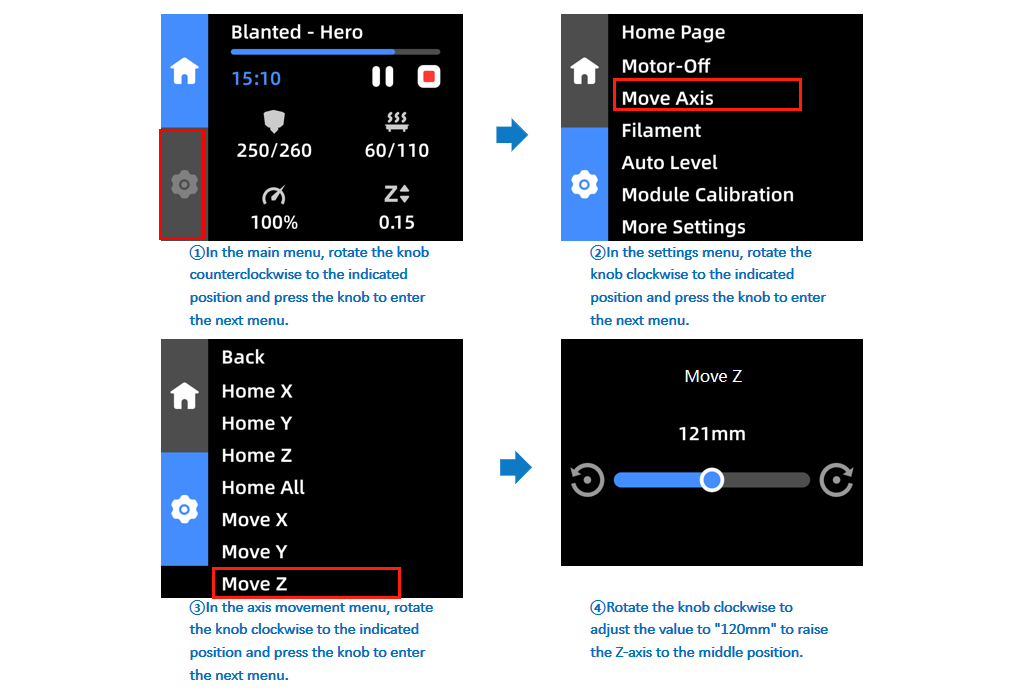
① In the main menu, rotate the knob counterclockwise to the indicated position and press the knob to enter the next menu.
② In the settings menu, rotate the knob clockwise to the indicated position and press the knob to enter the next menu.
③ In the axis movement menu, rotate the knob clockwise to the indicated position and press the knob to enter the next menu.
④ Rotate the knob clockwise to adjust the value to "120mm" to raise the Z-axis to the middle position.

¶ Step 2: Heat the Nozzle
Return to the settings menu, rotate the knob to the "Filament" option, and press the knob to enter the next menu. In the filament change menu, rotate the knob to the "Extrude" option and press the knob to start the heating process. The nozzle will automatically heat up to 215°C and begin extrusion. Press the knob to "Stop and Return" when finished.

¶ Step 3: Remove the Filament
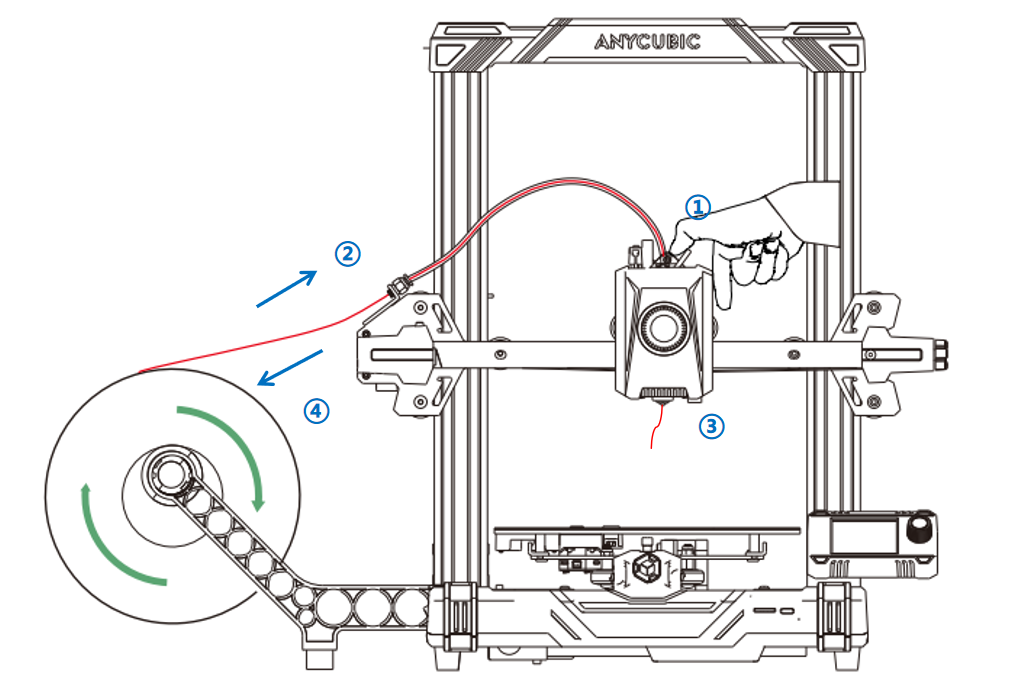
Once the nozzle has reached the target temperature, press the handle on the extruder to push the filament forward slightly. Quickly retract and remove the filament. Follow the sequence in the image provided.

¶ Step 4: Clean and Clear the Nozzle
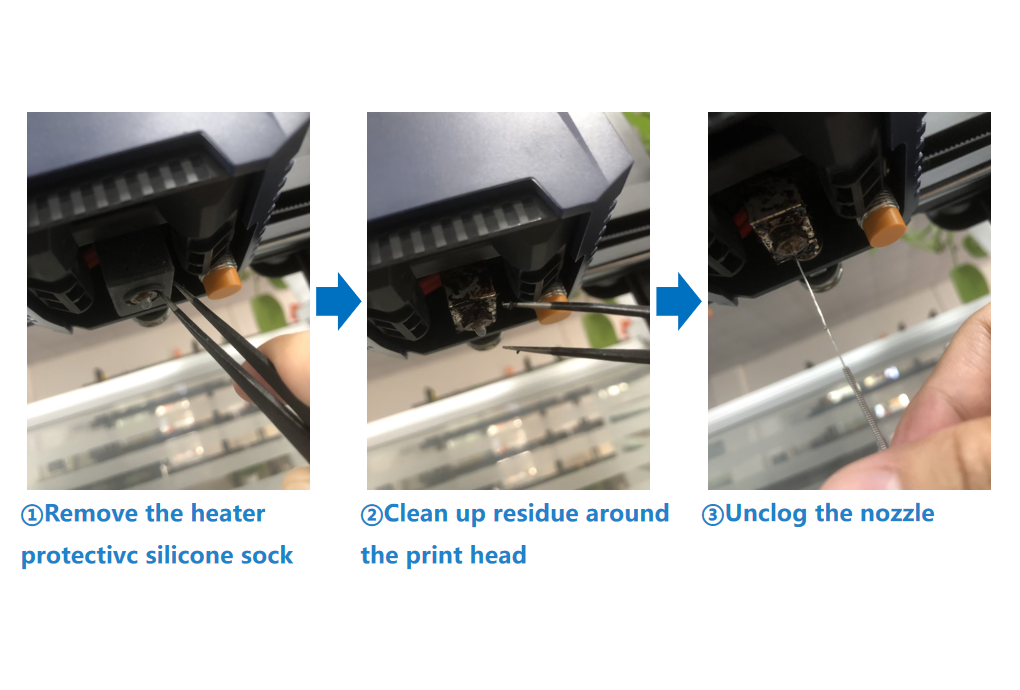
Use tweezers to remove the insulation sleeve from the nozzle and check for any filament residue or clogs around the nozzle. If there is residue, use tweezers to clean it. If there is a clog, gently clear it with a needle. After cleaning and clearing, turn off the machine and wait for the nozzle to cool before reinstalling the insulation sleeve.
If the nozzle is severely clogged and cannot be cleared, it needs to be replaced.
