¶ 1. Tools:
S2.0 Allen key
Open-end wrench
¶ 2. Disassembly Steps:
¶ Step 1: Turn Off the Device
Before replacing the offset measurement module, ensure the device is turned off and disconnect the power for safety.
¶ Step 2: Remove PEI Board
Manually move the heated bed to the front of the device for easy disassembly. Remove the PEI board from the heated bed.

¶ Step 3: Disassemble Offset Measurement Switch Module
① Use the S2.0 Allen key to loosen the 2 screws securing the offset measurement switch module.

② Move the offset measurement switch slightly outward and unplug the wires connected to it. Remove the offset measurement switch module.


¶ 3. Installation Steps:
¶ Step 1: Install the Offset Measurement Switch Module
① Take the new offset measurement switch module and connect it to the wires beneath the heated bed.

② Align the screw holes of the offset measurement switch module with those of the heated bed.
Use the S2.0 Allen key to tighten the 2 screws, ensuring alignment.

¶ Step 2: Install PEI Board
Take the previously removed PEI board and align it along the edge of the heated bed.

¶ 4. Calibration steps
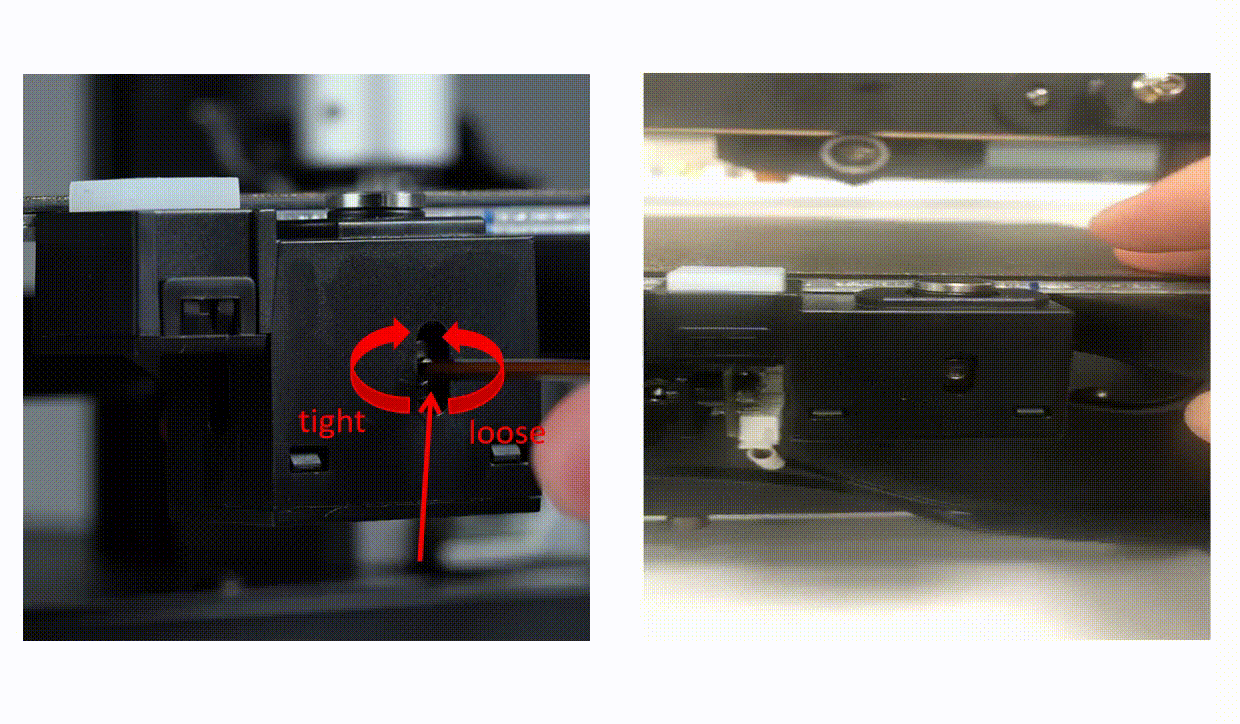
¶ Step 1: Adjust the screws behind the offset measurement module
Use an S2.0 Allen key to tighten the screws behind the module in a clockwise direction.
Apply slight upward force on the wrench during tightening to ensure that the module button is in the highest position.

¶ Step 2: Adjust the height of the offset measurement switch
Loosen the side screws of the module (about half to one full turn) to allow the button to pop up.
Observe whether the button height is higher than the platform (if it is lower, check the tightness of the side screws).
Then, place an open-end wrench directly above the offset measurement switch with the fixture edge against the edge of the heat bed.
Press the wrench on the middle of the stainless steel button.
Press the wrench in the middle and use an S2.0 Allen key to tighten the side screws of the module clockwise (the Allen key should not apply pressure up or down on the screws).

¶ Step 3: Check if the button rebounds properly
After tightening the screws behind the module (half to one full turn),
gently press the button to see if it smoothly depresses and rebounds.
If not, slightly loosen the screws behind the module until the button can depress and rebound normally.
¶ Step 4: Check for interference points on the button
Place the open-end wrench on the platform surface and move it left and right to check for any interference between
the open-end wrench and the upper surface of the module button.
If there is interference, it means the button is too high,
and you need to repeat steps 1, 2, and 3 until there are no interference points.
From the side, observe if there is a gap between the top surface of the module button and the bottom surface of the fixture.
If there is a gap, it indicates that the module button needs further adjustment. Repeat steps 1, 2, and 3 until there are no interference points.

¶ 5. Calibration Steps:
¶ Step 1: Turn On the Device
Connect the power cord to the device and press the power switch on the side to start the device.
Note:
When inserting the power cord, please avoid crossing it with the print head cable to prevent interference.

¶ Step 2: Nozzle Calibration
① On the main interface, rotate the knob counterclockwise to select the settings icon, and then press the knob to enter the settings menu.
② In the settings menu, rotate the knob clockwise to select "Module Calibration," and then press the knob to enter the calibration menu.
③ In the calibration menu, first rotate the knob clockwise to select "Position Calibration."
The machine will automatically probe and stop near the calibration module.
Observe the distance between the nozzle and the center position above the calibration module.
You can enter the axis movement interface by selecting the X/Y move distance option on the screen and pressing the knob.
Adjust the corresponding axis distance to align it with the center position of the calibration module.
Then press the knob again to return to the calibration menu. Finally, click the "Save" button to complete the calibration.
Please note that after completing the calibration, perform an automatic leveling again.


¶ Step 3: Auto Leveling Calibration
① On the main interface, select the settings icon by rotating the knob counterclockwise.
② In the settings interface, rotate the knob clockwise to select "Auto Level" and press the knob. A popup will appear; select "√" to initiate the device's preheating,
nozzle cleaning, and automatic leveling process.
Note:
I. Please check whether the PEI board is installed before leveling.
II. The leveling sensors is only used for platforms with metal surface.
If you replace the print platform yourself, please choose a platform with a metal surface to ensure the normal use of the automatic leveling function.
III. This PEI sheet can be used for printing on both sides,
but you need to follow the following rules: If you level the bed using side A, then you should also print on side A. If you switch to side B, you will need to re-level the bed.

¶ Step 4: Adjust Z-Axis Compensation
① Insert the TF card into the device's slot.
② Select any model and start printing.
Note: After starting the print, carefully observe the first layer. If situations ① and ③ occur, indicating a mismatch in Z Offset,
you can make fine adjustments during the printing process.
Adjust the distance between the print head and the heated bed. After making adjustments, you can pause the print task (for testing purposes only).
Then, start printing the actual model file you need.

If the above steps do not provide assistance or if you encounter any other issues during subsequent use, we recommend that you create a support ticket.
The after-sales engineers will assist you in finding a solution to the problem(Reply time :1 working day)
Please click this link to submit your ticket: