¶ 1.Z-Axis Lead Screw
¶ 1)Background
During the use of Kobra 2 Plus, if you hear abnormal noises while the Z-axis lead screw is in operation, it may indicate a maintenance issue.
If your device's actual printing speed is above 200 millimeters per second, it is normal, as this noise is caused by the high-speed printing and metal friction.
Since the type of noise cannot be quantified, the printing speed is provided as a reference value.
¶ 2)How to Determine if Maintenance is Needed
Generally, the Z-axis lead screw should be maintained regularly, about every 3 months. If you hear abnormal noises or sounds while moving the Z-axis, it indicates that the Z-axis lead screw needs maintenance.
¶ 3)How to Maintain the Z-Axis Lead Screw
¶ Tips:
Try not to use lubricating oil, as it may flow into the motor and damage the internal structure.
¶ Step 1: Clean the Lead Screw
Use a lint-free cloth to clean the Z-axis lead screw, ensuring its surface is smooth and free of dust or impurities.
¶ Step 2: Zero the Z-Axis
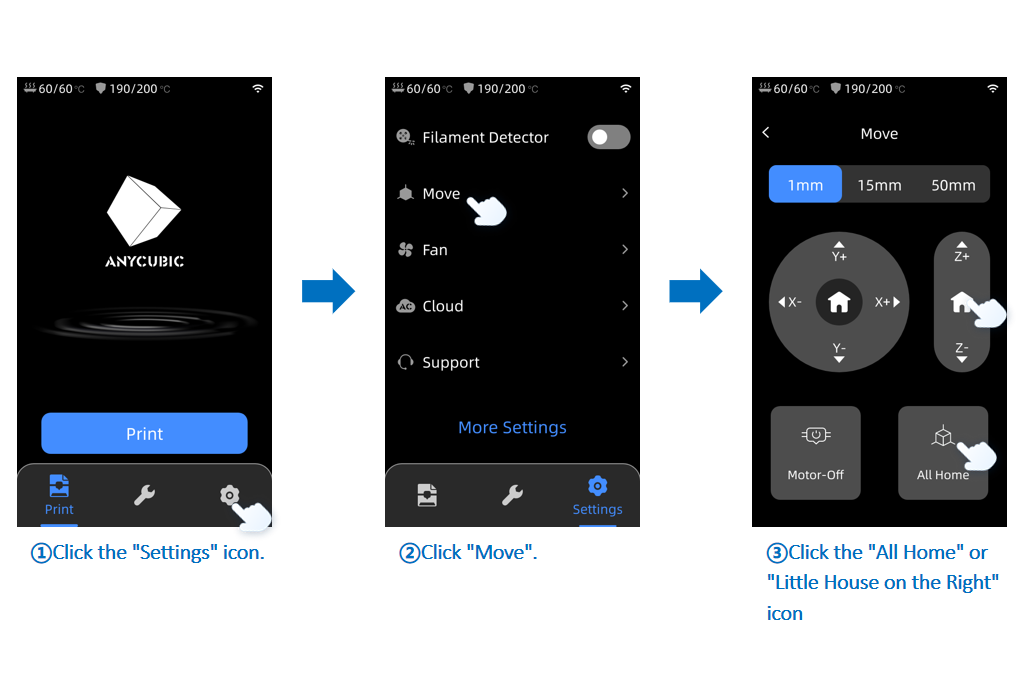
Power on the printer, go to the main menu, select "Settings," click on "Move," and then click on "All Home" or the "house" icon on the right to zero the Z-axis.
¶ Step 3: Lubricate the Lead Screw
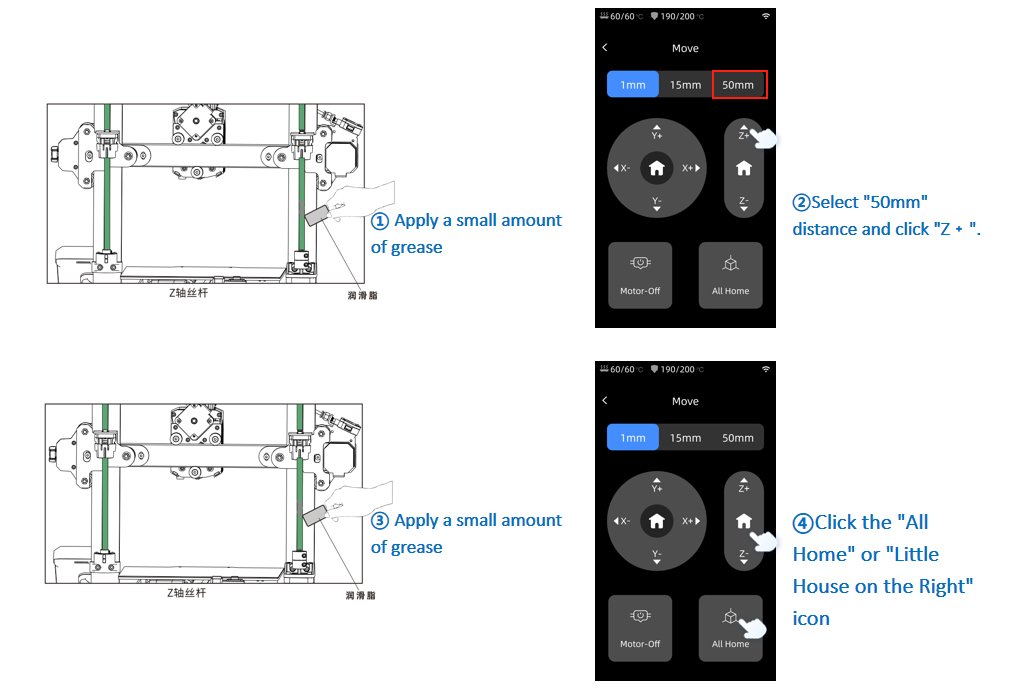
Apply a small amount of lubricating grease to the surface of the Z-axis lead screw along its height. Then, select "50mm" distance and click the "Z+ arrow" to move the X-axis module upward. Click 5 times to the top. At this point, apply a small amount of lubricating grease to the surface of the Z-axis lead screw motor. Then, click "Home All" or the "house" icon on the right to zero the Z-axis. Repeat this process to ensure the lubricating grease covers the entire surface of the lead screw. Finally, wipe off any excess grease.
¶ Step 4: Test
After lubrication, perform some test prints to ensure smooth Z-axis movement without any abnormal noises.
¶ 2.X/Y Double Metal Spindles
¶ 1)Background
Kobra 2 Plus is supported and guided by a dual shaft guide rail system on the X/Y axis to ensure smooth motion and accurate positioning. The guide rail system typically consists of guide rails (dual shaft profiles) and guide rail sliders (SGR15 bearings), which slide on the guide rails to move the Heated bed. Some extruded material or debris may attach to the guide rails or bearings, affecting print quality.
¶ 2)How to Determine if Maintenance is Needed
It is recommended to check the X/Y Double Metal Spindles once a month to ensure they are clean and free from any foreign matter. This helps to maintain the smooth operation of the guide rails and ensures the stability and accuracy of the machine.
¶ 3)How to Maintain the X/Y Double Metal Spindles
¶ Step 1: Check the Guide Rails
Turn off the machine and disconnect the power. Use a lint-free cloth or soft brush to check if there is any dust, debris, or other foreign matter attached to the surface of the guide rails. If so, gently remove them. Check if the guide rails move smoothly without any sticking or resistance. Gently move the X/Y axis by hand to observe the movement of the guide rails.
¶ Step 2: Clean the Guide Rails
If you find a considerable amount of dust or debris on the guide rails, you could perform the following cleaning steps:
Use an air gun or a hairdryer to blow off the dust on the surface of the guide rails. If using an air gun, press the handle lightly, avoiding excessive blowing to prevent dust from entering other parts or damaging other electronic components.
¶ Step 3: Lubricate the Guide Rails
Apply a small amount of lubricating grease along both sides of the X/Y axis guide rails. Then, gently move the corresponding Hotend and Heated bed to evenly distribute the grease on the guide rails.
¶ Step 4: Test
After maintenance, gently push and pull the Heated bed and Hotend by hand to check for any sticking or wobbling. If any issues are found, you could refer to the Heated bed leveling guide video to readjust the hexagonal eccentric pillars.
Reconnect the power and turn on the machine. Run a test print to observe the smooth movement of the X/Y axis without any abnormal resistance or noise. Ensure that the guide rails are clean and functioning properly.
¶ 3.Z-Axis V-slot wheel
¶ 1)Background
Kobra 2 Plus uses a V-slot wheel motion structure for the Z-axis. If the V-slot wheel is damaged, it may affect print quality.
¶ 2)How to Determine if Maintenance is Needed
It is recommended to check the wear and tear of the Z-axis V-slot wheel monthly and replace it as needed. This helps to maintain the normal operation of the pulley and ensures the stability and accuracy of the 3D printer.
¶ 3)How to Maintain the Z-Axis V-slot wheel
Turn off the machine and disconnect the power. Check the surface of the V-slot wheel for obvious signs of wear, such as scratches, deformation, or damage. If the pulley is significantly worn, it needs to be replaced.
¶ 4.Nozzle
¶ 1)Background
During the printing process, the melted printing material is extruded through the nozzle. When the material cools and solidifies at the nozzle, it may cause clogging. This is usually caused by unsuitable temperatures or excessive printing speeds, affecting the print quality.
¶ 2)How to Determine if Maintenance is Needed
It is recommended to check the extrusion condition of the nozzle every month. If you encounter any of the following situations, you may consider performing nozzle maintenance:
①The extrusion is thin or uneven.
②The nozzle is clogged, preventing normal printing.
③The nozzle experiences material leakage.
¶ 3)How to Maintain the Nozzle
¶ Required tools:
● Steel needle,
● tweezers
¶ Tips:
When using a steel needle for unclogging, be aware that the melted printing material may come into direct contact with your hands along with the needle, which could cause burns or other injuries. When switching to different types of printing materials, make sure the old printing material is fully extruded.
For example, if you initially used ABS material to print at 240°C and then switch to PLA material at 190°C, there may be some residual ABS material in the throat tube that requires a high-temperature state to melt, leading to nozzle clogging when printing PLA material.
After replacing the consumables, set the nozzle temperature to 250°C, then click "Extrude." After waiting for three minutes, the new consumable will completely replace the residue of the old consumable in the throat tube.
¶ Step 1: Raise the Z-Axis
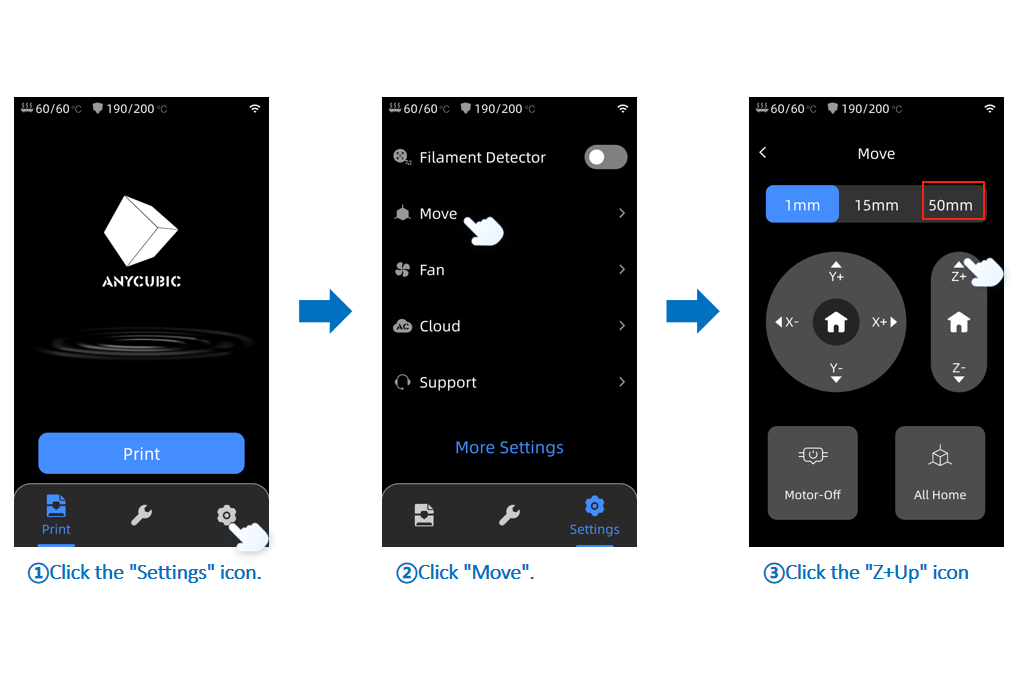
Power on the printer, go to the main menu, click on "Settings" ➞ "Move" select "50mm" as the unit, and click the "Z+ Up" to raise the Z-axis to the middle height.
¶ Step 2: Heat the Nozzle
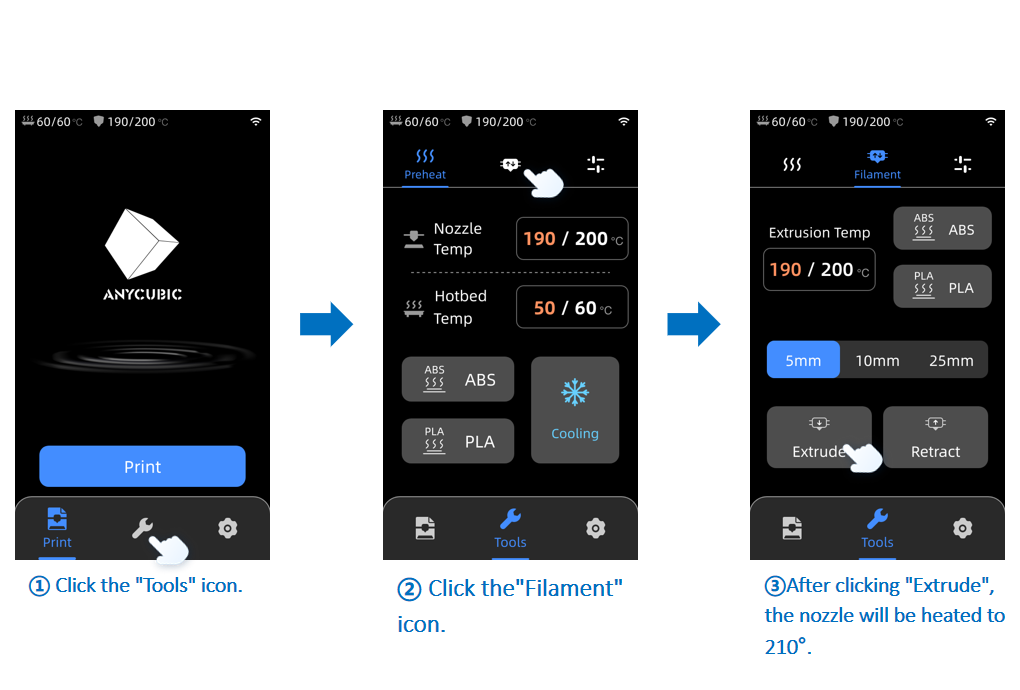
Return to the main menu, click on "Tools" icon ➞ "Filament" icon and finally click "Extrude." The nozzle will automatically heat up to 210°C.
¶ Step 3: Remove the Consumable
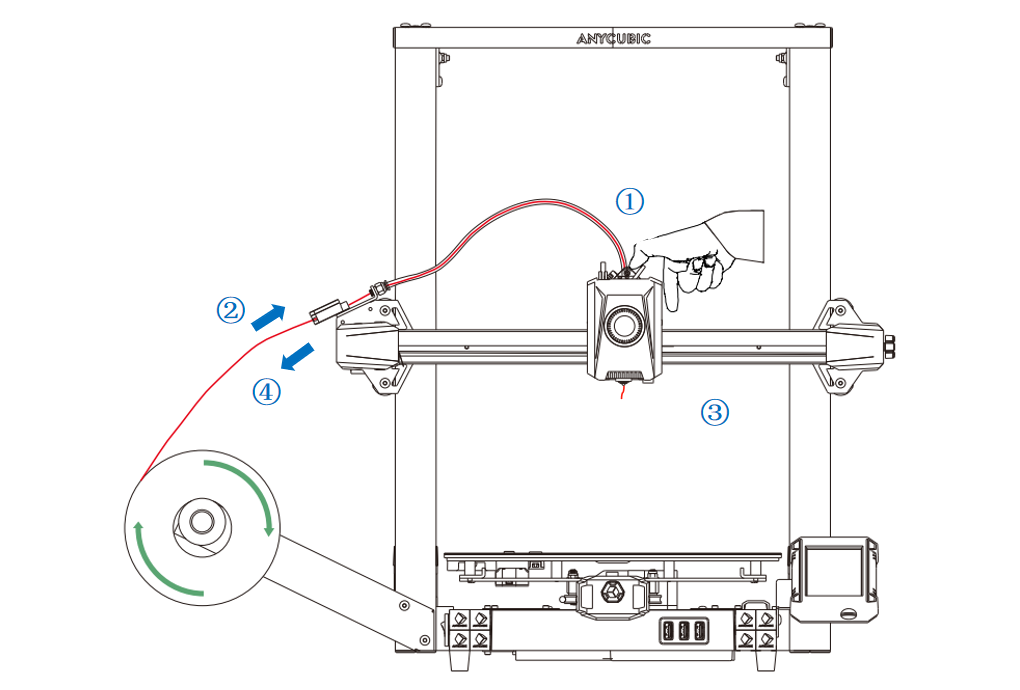
Once the nozzle reaches the target temperature, you could press the handle on the extruder to push a small amount of filament, and then quickly pull out the filament. Follow the steps in the figure below for sequential operation.
¶ Step 4: Clean and Unclog the Nozzle
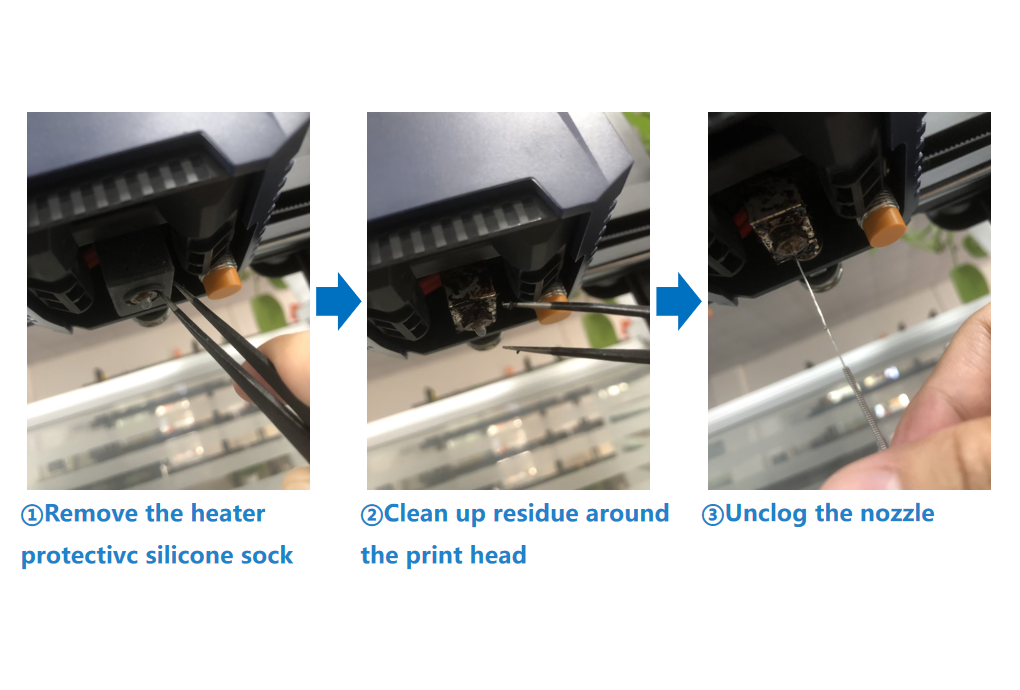
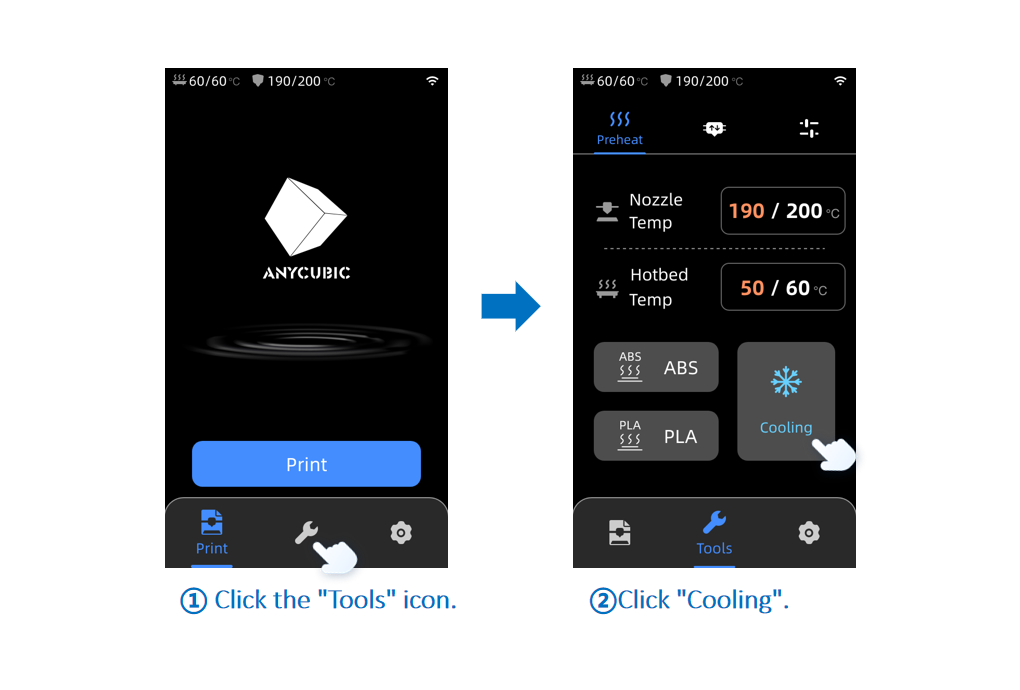
Use tweezers to remove the thermal insulation cover on the nozzle and check if there is any residue or clogging of the printing material around the nozzle. If there is residue around the nozzle, use tweezers to clean it. If there is clogging, gently unclog the nozzle with a steel needle. After cleaning and unclogging, return to the main interface on the touch screen, click on "Tools" icon ➞ "Cooling" to cool down the nozzle, and after a short period, assembly the thermal insulation cover back on the nozzle.
If serious clogging is found, and unclogging is unsuccessful, the nozzle needs to be replaced.
How to replace the nozzle?(/en/fdm-3d-printer/vyper/vyper-replace-the-nozzle)
