¶ 1.Required tools:
● M3.0 Allen wrench
● M4.0 Allen wrench
● Open-end wrench
¶ 2.Disassembly steps:
¶ Step 1: Power off the printer
Before replacing the Y-axis bearing pulley, make sure to turn off the printer and disconnect the power supply for safe operations.
¶ Step 2: Remove the belt copper buckles
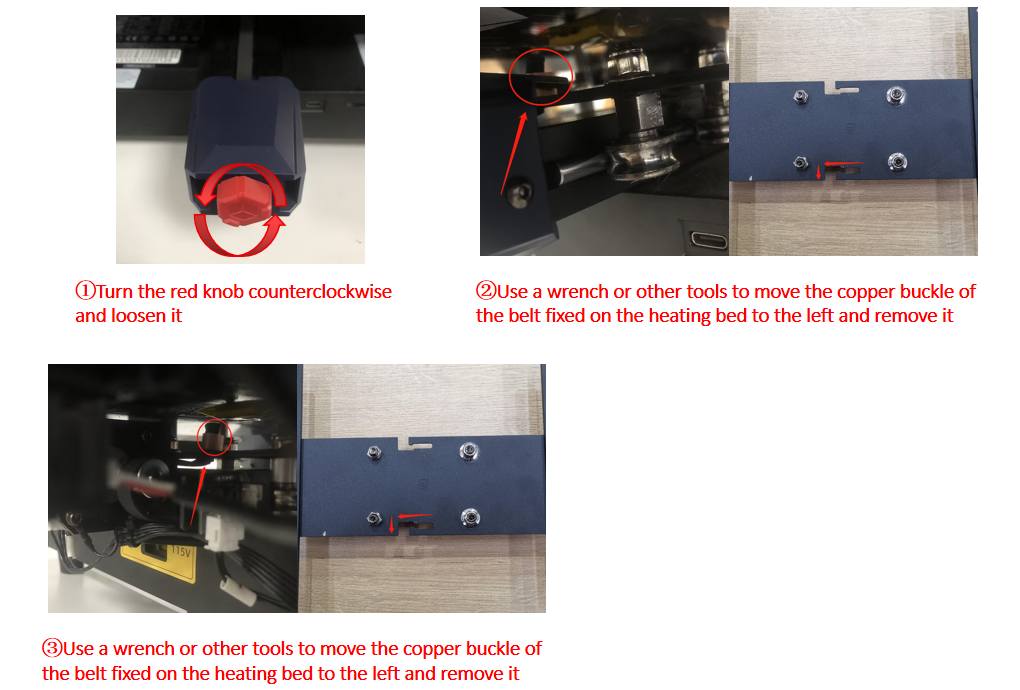
① Rotate the red knob of the Y-axis belt tensioner counterclockwise to loosen the belt.
② Move the heated bed to the front and use a wrench or other tool to slide and remove the belt copper buckle fixed on the heated bed to the left.
③ Move the heated bed to the rear of the Y-axis and use a wrench or other tool to slide and remove the belt copper buckle fixed on the heated bed to the left.
¶ Step 3: Remove the Y-axis motor module
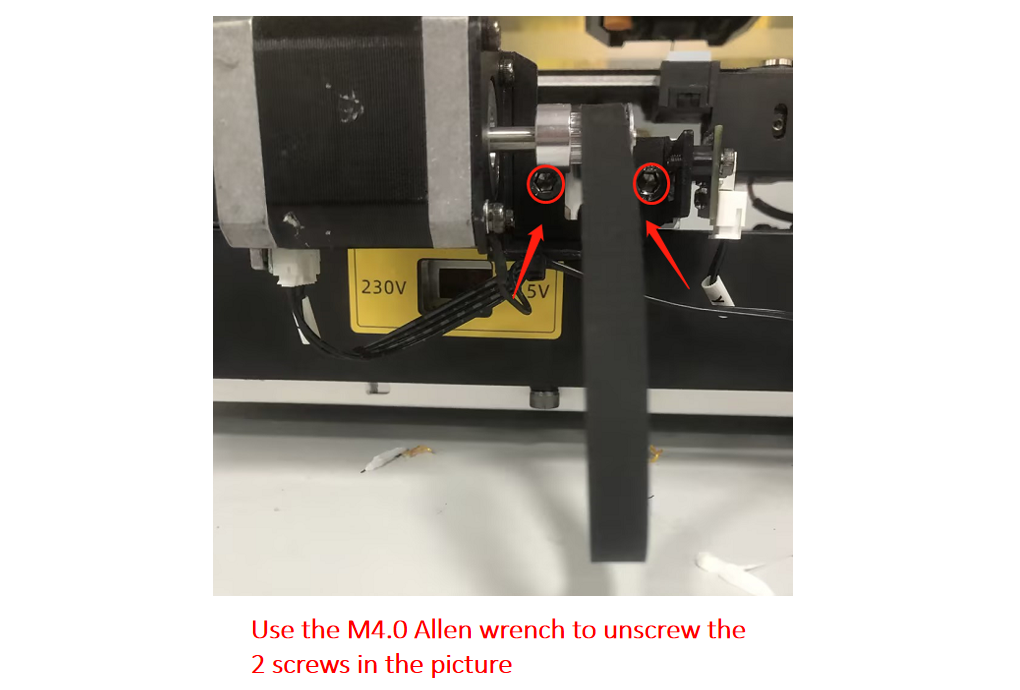
Use an M4.0 Allen wrench to remove the 2 screws at the marked position. (Since the Y-axis motor module and wiring are secured together with cable ties, you could place the Y-axis motor module within the range of movable wiring.)
¶ Step 4: Remove the bearing pulley
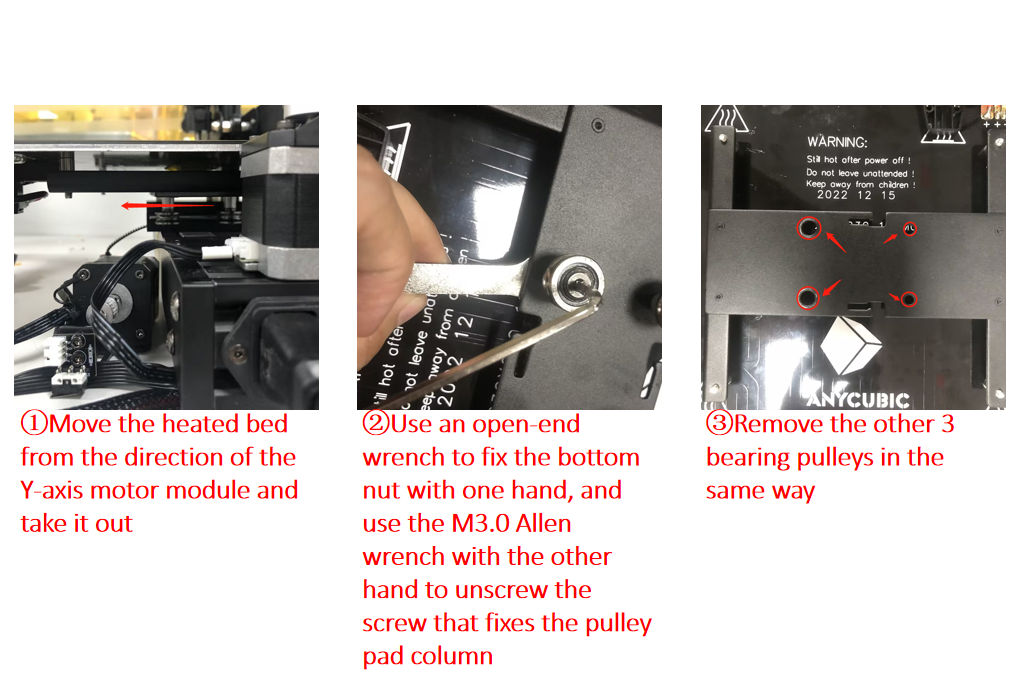
① Move the heated bed in the direction of the Y-axis motor module and remove it. (Place the heated bed within the range of movable wiring.)
② Use one hand to hold the bottom nut with an open-end wrench and use an M3.0 Allen wrench to unscrew the screw that secures the pulley spacer.
③ Remove the other 3 bearing pulleys using the same method.
④ Place the two types of nuts in a suitable position for use during the installation of the new pulleys.
¶ 3.Installation steps:
¶ Step 1: Install the bearing pulley
Note:
1.Place the heated bed with the printing surface facing to the table.
2.Due to the presence of 2 larger and 2 smaller screw holes on the mounting bracket, ensure that the component with the hex eccentric spacer aligns with the larger holes during installation. This ensures the correct installation position.
3.The larger nuts are used in combination with the hexagonal spacer.

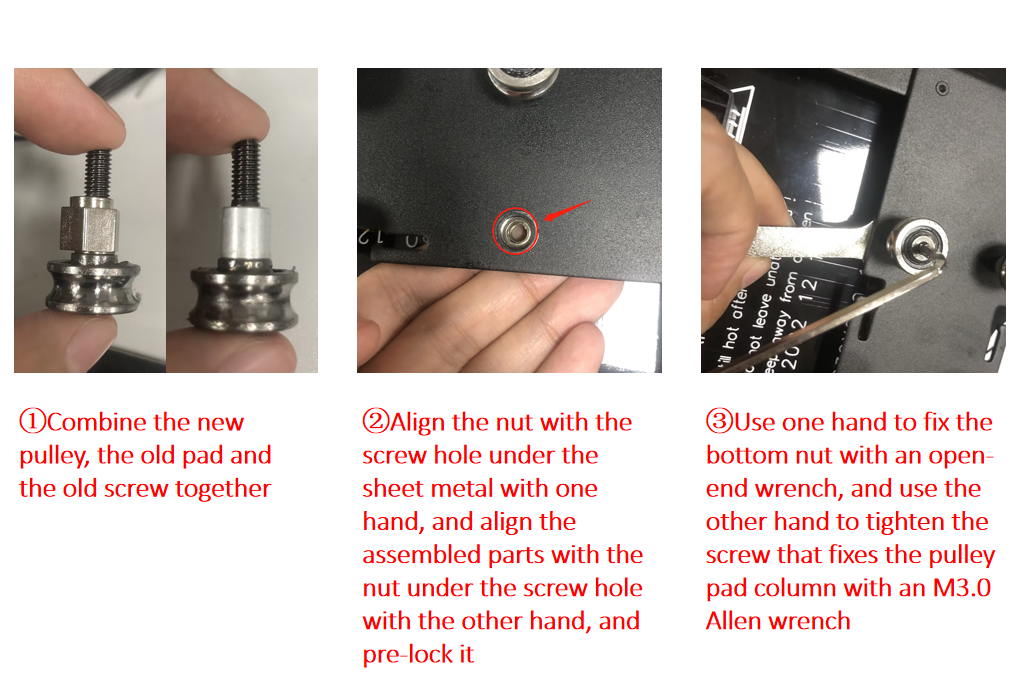
① Combine the new pulley with the old spacer and screw.
② Align the nut with the screw hole on the bracket using one hand, and align the assembled parts with the nut under the screw hole. Pre-lock them. (Note that there are two types of nuts, and the two thicker ones should align with the larger holes on the bracket.)
③ Use one hand to hold the bottom nut with an open-end wrench, and use an M3.0 Allen wrench to tighten the screw that secures the pulley spacer.
¶ Step 2: Install the Y-axis motor module
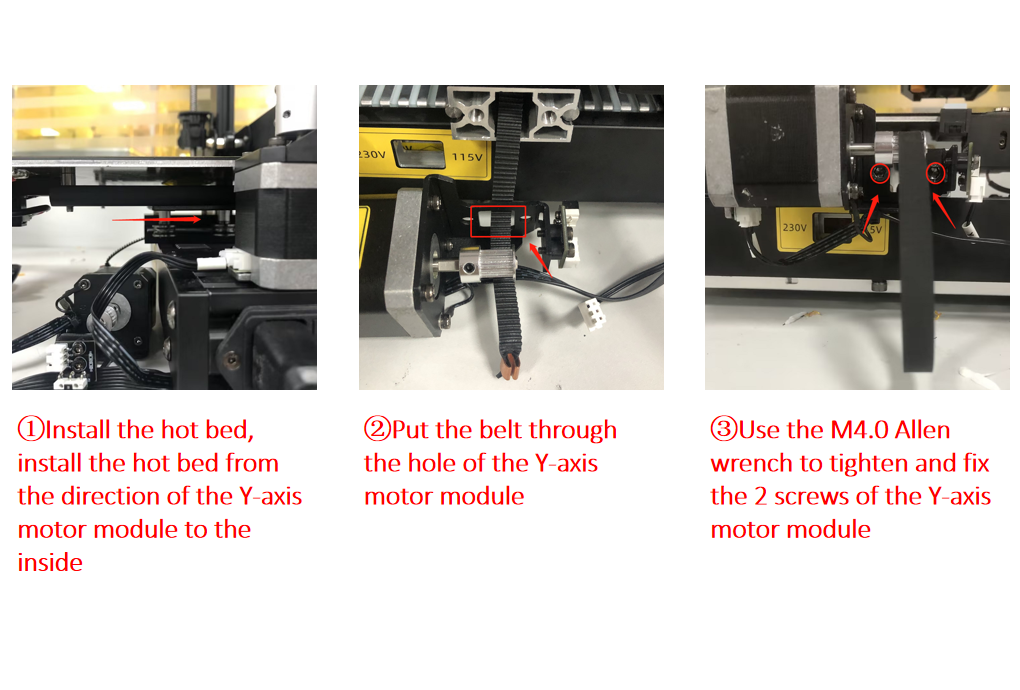
① Install the heated bed by gently pushing it in the direction of the Y-axis motor module, making sure not to let the pulleys hit the aluminum extrusion.
② Thread the belt through the holes in the Y-axis motor module.
③ Use an M4.0 Allen wrench to tighten the 2 screws that secure the Y-axis motor module.
¶ Step 3: Install the belt copper buckles
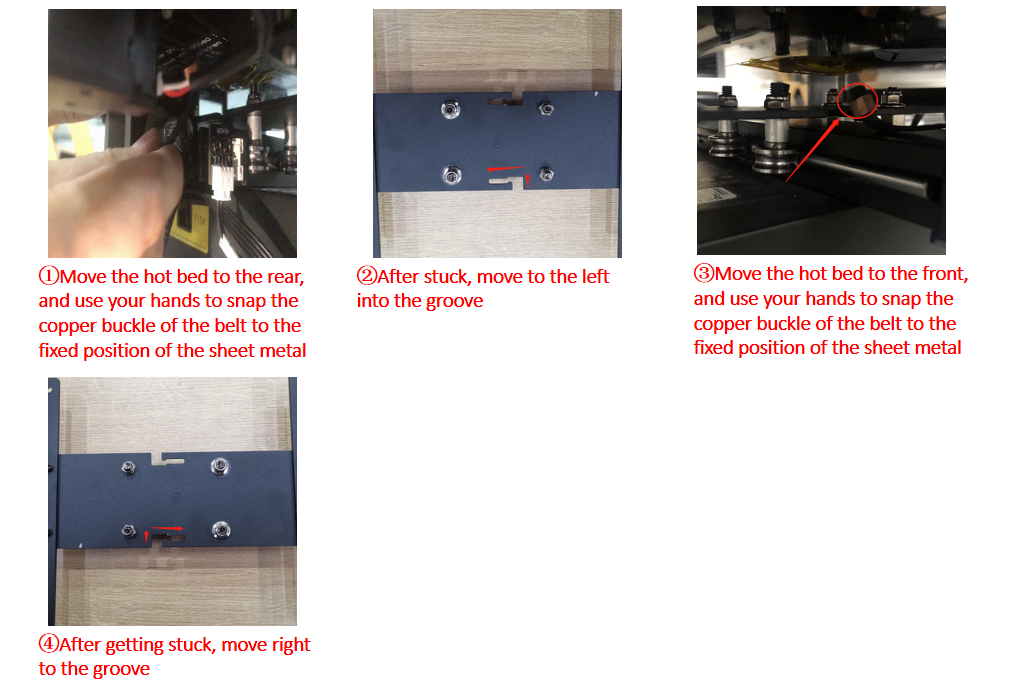
① Move the heated bed to the rear of the Y-axis and use your hand to fasten the belt copper buckle to the fixed position on the bracket.
② Once fastened, move the belt to the left into the groove.
③ Move the heated bed to the front and use your hand to fasten the belt copper buckle to the fixed position on the bracket.
④ Once fastened, move the belt to the right into the groove.
¶ 4.Adjust the belt tension:
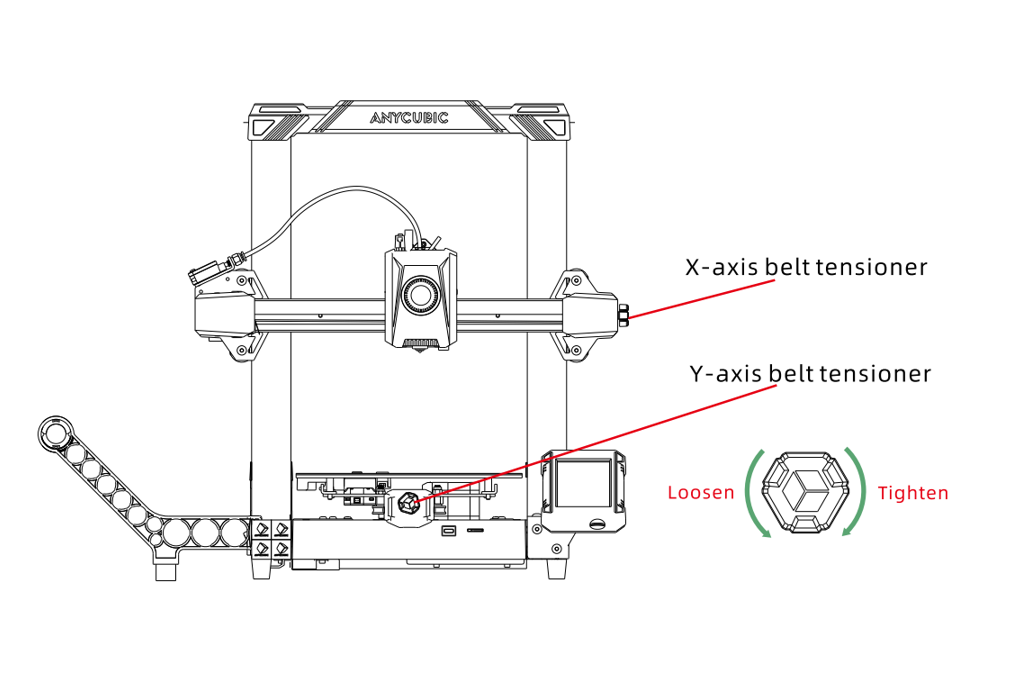
Rotate the Y-axis tensioner knob clockwise until it is tightened, and then rotate it counterclockwise one full turn.
¶ 5.Adjust the stability of the heated bed:
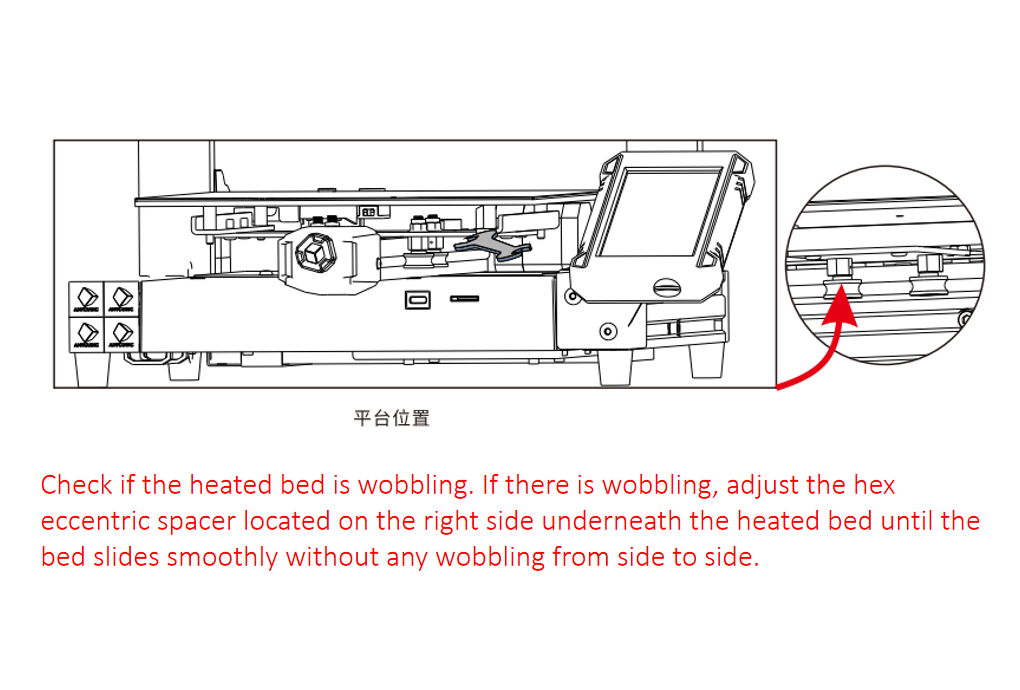
Use an open-end wrench to adjust the hex eccentric spacer on the right side of the heated bed until the bed can be slide smoothly, and there is no noticeable wobbling when moving the bed from side to side. For a more detailed step-by-step demonstration, you could refer to the leveling guide video for Kobra 2:
The relevant adjustment steps are shown starting from 57 seconds in the video. Follow the instructions in the video to ensure smooth movement and stability of the heated bed.
If you have further questions, we suggest you create an after-sales ticket and our After-sales engineers will help you solve the problem. (Reply time :1 working day)
Please click this link to submit your ticket: