¶ 1.Tools:
S2.0 Allen key*1
S2.5 Allen key*1
¶ 2.Disassembly steps:
¶ Step 1: Turn off the printer
Before replacing, turn off the printer and disconnect the power supply to ensure safe operation.
¶ Step 2: Close ACE Pro
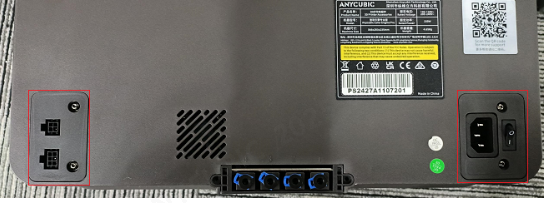
Unplug the ACE Pro signal cable and power cable, then remove the Teflon tube.
¶ Step 3: Disassemble the ACE Pro case
1. Use an S2.0 Allen key to loosen the screws that secure the ACE Pro signal input board
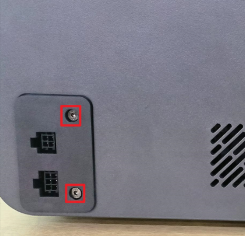
2. Use an S2.0 Allen key to unscrew the two screws that secure the cover.

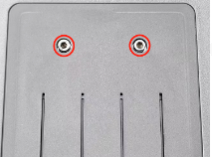
3. Tear off the foot pads and use an S2.5 Allen key to unscrew the six screws that secure the inner shell of ACE Pro.。

¶ Step 4: Separate the ACE Pro inner shell
Use an S2.5 Allen key to unscrew the two screws that secure the multi-color cover, and then separate the inner and outer shells of ACE Pro.。


¶ Step 5: Disassemble the motor
1. Use an S2.5 Allen key to unscrew the four screws that secure the motor. Push the motor outwards and tilt the motor to separate it from the synchronous belt.。

2. Use an S2.5 Allen key to unscrew the four screws that secure the motor. Push the motor outwards and tilt the motor to separate it from the synchronous belt.。

¶ Step 6: Disassemble the feed assembly
1. Use an S2.0 Allen key to unscrew the two screws that secure the feed detection plate.

2. Use an S2.5 Allen key to unscrew the four screws that secure the feed channel assembly.

3. Use an S2.5 Allen key to unscrew the eight screws that secure the bearing gland plate.

4. Use an S2.0 Allen key to unscrew the screws that secure the shift dial and remove the shift dial.

5. Remove the driven wheel assembly, paying attention to the bearings at both ends falling off.

¶ 3. Installation steps:
¶ Step 1: Install the driven wheel assembly
The synchronous belt passes through the driven wheel assembly so that all eight bearings are inserted into the grooves.

¶ Step 2: Install the bearing gland plate
Use an S2.5 Allen key to tighten the eight screws that secure the bearing gland plate.

¶ Step 3: Install the shift dial
Align the shift dial with the D-axis and use an S2.0 Allen key to tighten the screws that secure the shift dial.

¶ Step 4: Install the motor
1. Use an S2.5 Allen key to pre-tighten the four screws that fix the motor. At the same time, push the motor inward to tighten the synchronous belt. Then tighten the screws and insert the motor harness into the motor terminal.。
2. Use an S2.5 Allen key to pre-tighten the four screws that fix the motor. At the same time, push the motor inward to tighten the synchronous belt. Then tighten the screws and insert the motor harness into the motor terminal.

¶ Step 5: Install the casing
1. Pass the power socket and signal cable board through the outer shell and out from the rear hole of the bottom shell.

2.Install the bottom case

3. Use an S2.5 Allen key to tighten the two screws that secure the multi-color cover.
¶ Step 6: Install the housing baffle
1. Use the S2.0 Allen key and S2.5 Allen key to tighten the screws that secure the ACE Pro signal input board
2. Use an S2.0 Allen key to tighten the two screws that secure the cover plate.
3.Use an S2.0 Allen key to tighten the two screws that secure the signal input HUB board, and then tighten the two screws that secure the cover board.

4.Tear off the foot pads and use an S2.5 Allen key to tighten the four screws that secure the inner shell of the ACE Pro.