¶ 1.Caution:
Resonance compensation needs to be performed again after replacing the X-axis belt.
¶ 2.Tools:
S2.0 Allen key*1
¶ 3.Disassembly Steps:
¶ Step 1: Turn off the printer
Before replacing the X-axis belt, make sure to turn off the printer and disconnect the power supply to ensure safe operation.
1.Turn off the power.

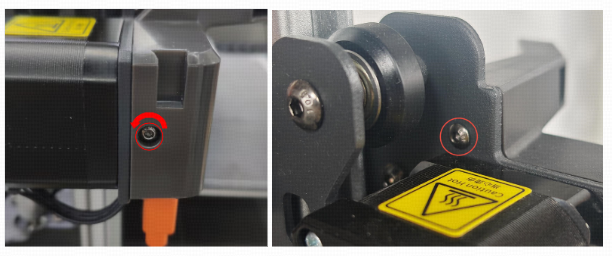
¶ Step 2:Disassembly Purge Wiper Replace Guide
Use an S2.0 allen key to unscrew the 4 screws fixing the print head module, and set the ejection assembly aside.

Unscrew the fastener screws of the ejection assembly
¶ Step 3: Remove the X-axis belt tensioner and X-axis left end cover
1. Rotate the X-axis tensioner knob to the left and remove the knob completely

2. Use an S2.0 allen key to remove the X-axis tensioner housing fixing screws

3. Take out the X-axis tensioner housing

4. Remove the housing and tensioner

5. Use an S2.0 hex wrench to remove the X-axis left end cover fixing screw.
¶ Step 4: Remove the belt
1. Pull out the X-axis timing belt

2. Pull the timing belt outward

¶ 4.Installation steps:
¶ Step 1: Install the belt
1. Pass the timing belt with the bayonet through the aluminum profile

2. The other end of the timing belt passes under the aluminum profile

3. Pass the timing belt through

4. Snap the timing belt into place
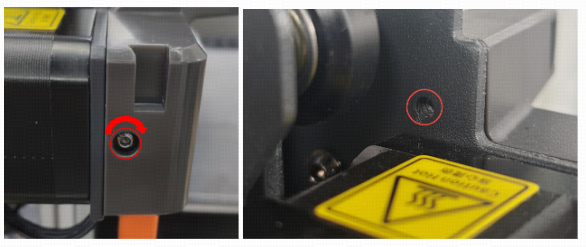
¶ Step 2: Install the X-axis tensioner and ejection assembly
1.The housing and tensioner are installed in place.

2. Insert the X-axis tensioner housing into the aluminum profile.

3. Use an S2.0 allen key to tighten the X-axis tensioner housing fixing screws

4. Use the S2.0 allen key to tighten the fastener screws of the ejection assembly.

¶ Step 3: Tighten the X-axis tensioner
1. Screw the adjustment knob onto the X-axis belt tensioner holder

2. Make sure the timing belt is meshed with the gear

3. Use an S2.0 allen key to tighten the X-axis left end cover fixing screw.
¶ Step 4:Resonance Calibration

Click“Tools”-“Control”-“Resonance Calibration”