¶ 1. Z-axis screw rod
¶ 1) Problem background
During the use of Kobra S1, if you hear abnormal noise during the operation of the Z-axis screw rod, this may be a maintenance problem.
If the actual printing speed of your device is above 350 mm per second, it is normal. This is due to the metal friction sound caused by the high-speed printing of the device.
Since the type of sound cannot be quantified, the printing speed is only used as a reference value here.
¶ 2) How to judge whether maintenance is needed
Generally speaking, the Z-axis screw rod should be maintained regularly about 3 months, or when moving the Z axis, you hear abnormal noise or sound, which is also an indication that the Z-axis screw rod needs maintenance.
¶ 3) How to maintain the Z-axis screw rod
Note:
Try not to use lubricating oil as much as possible, as the lubricating oil will flow down the screw rod.
¶ Step 1: Clean the screw rod
Use a dust-free cloth to clean the Z-axis screw rod to ensure that its surface is smooth and free of dust or impurities.
¶ Step 2: Zero the Z axis
Turn on the power, select "Tools" in the main menu bar, click "Move ", and click "All Zero" or "Z Zero" to zero the Z axis.

¶ Step 3: Lubricate the lead screw
Click "Z Zero" to raise the printing platform to the highest position, and apply a small amount of grease on the surface of the Z axis lead screw in the height direction. Click "Z+" to move down and use the printing platform to descend to the lowest position.
Similarly, when the printing platform is at the lowest position, apply a small amount of grease on the surface of the Z axis lead screw in the height direction, and click "Z Zero"
¶ Step 4: Test
After lubrication, some test prints can be performed to ensure that the Z axis moves smoothly and there is no abnormal noise.
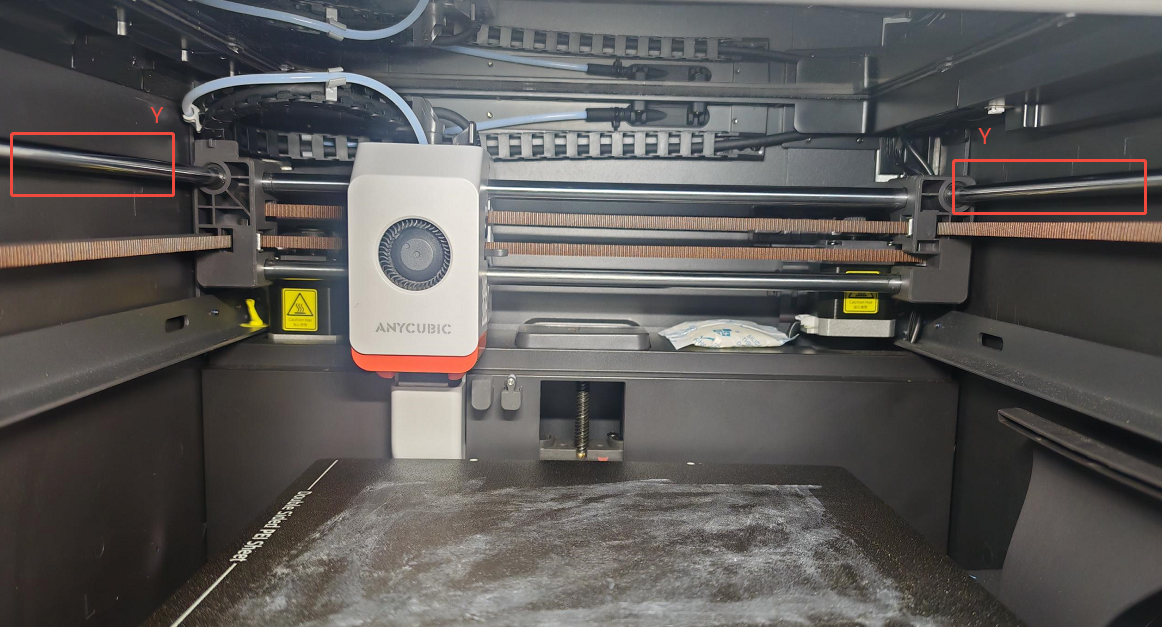
¶ 2. Y axis optical axis
¶ 1) Problem background
The Kobra S1 Y axis is supported and guided by the optical axis system to ensure smooth movement and accurate positioning. The optical axis system usually includes an optical axis and a linear bearing, and the movement of the Y axis assembly is achieved by the sliding of the linear bearing on the optical axis. There may be some extruded materials or foreign objects attached to the optical axis or linear bearing, affecting the printing quality.
¶ 2) How to determine whether maintenance is needed
It is recommended to check the Y-axis optical axis once a month to ensure that it is clean and free of foreign objects. This helps to maintain the normal operation of the optical axis and ensure the stability and accuracy of the machine.
¶ 3) How to maintain the Y-axis optical axis
¶ Step 1: Check the Y-axis optical axis
Turn off the machine and disconnect the power. Use a dust-free cloth or soft brush to check whether there is dust, debris or other foreign objects attached to the surface of the optical axis. If there is, please gently remove them. Check whether the running track of the optical axis is smooth, without jamming or resistance. Gently move the Y-axis by hand and observe the movement of the optical axis.
¶ Step 2: Clean the optical axis
If you find that there is a lot of dust or debris on the optical axis, you can take the following cleaning steps:
Use an air gun or a blower to gently blow away the dust on the surface of the guide rail. If you use an air gun, just click the handle, and be careful not to blow too much air to avoid blowing dust into other components or damaging other electronic parts.
¶ Step 3: Lubricate the guide rail
Apply a small amount of grease along the core surface of the Y-axis optical axis. Then gently move the Y-axis assembly. Make it evenly distributed on the optical axis.
¶ Step 4: Test
After completing the maintenance, gently push and pull the print head module by hand to check if there is any jamming or shaking.
Reconnect the power supply and turn on the machine. Perform a print test run to observe whether the Y-axis movement is smooth, without abnormal resistance or noise. Ensure that the optical axis is clean and working properly.
¶ 3. X-axis optical axis
¶ How to maintain the Y-axis optical axis
If the optical axis of the X-axis assembly is dirty, you can use a dust-free cloth with some alcohol to wipe the optical axis to ensure that its surface is smooth and free of dust or impurities.
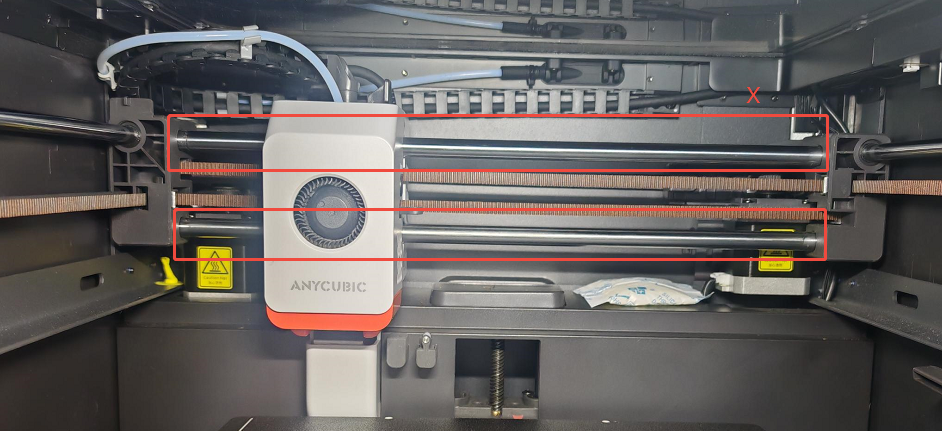
The X-axis assembly is composed of an optical axis and a graphene bearing sleeve, and graphene itself has a lubricating effect. Therefore, the optical axis of the X-axis cannot be greased.