Firstly, check whether there is solidified resin in the vat. If there is none, please follow the first solution for detection. If there is, please follow the second solution.
¶ 1. No solidified resin in the vat
The light source cannot pass through the LCD screen.
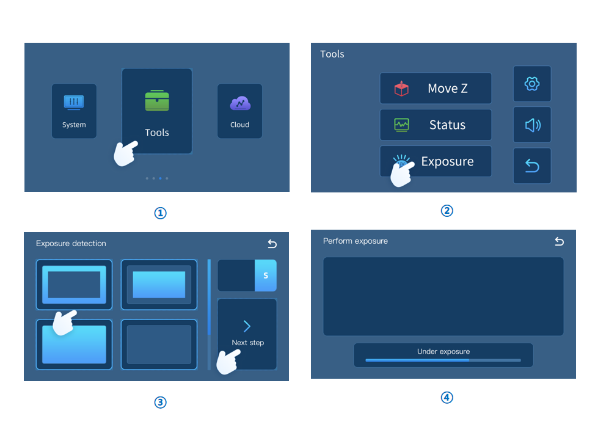
Remove the vat and printing platform. Put an A4 paper on the LCD screen and perform exposure according to the following diagram (different printer may have slightly different screen displays, please operate according to actual situation).
Check if the image displayed on the LCD screen is consistent with the selected rectangular image. If it is, it indicates that there is no problem with the light source. Please refer to the second and third solutions for problem troubleshooting.
¶ 2. There is solidified resin in the vat
And the model does not stick to the printing platform.
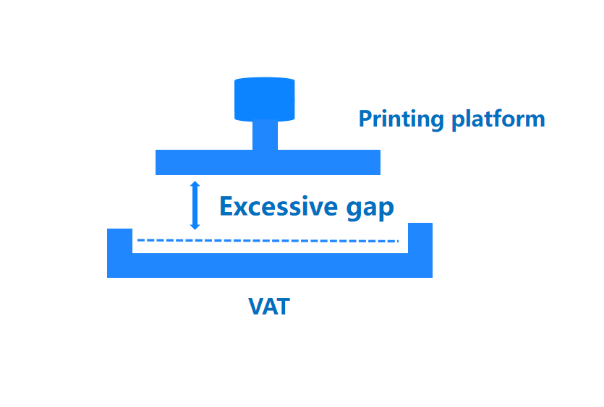
¶ 1) The gap between the zero point position(Z=0) of the printing platform and the release film on the bottom of the vat is too large, and the resin cannot stick to the printing platform when solidifying.
¶ ①Leveling problem
If it is the first time printing, the leveling problem may not be low enough. Please refer to the corresponding machine manual or unboxing video to re-level and print the U disk test file.
¶ ②Loose release film
If the release film is loose (generally occurs when the release film is self-replaced and not installed firmly), the release film screw needs to be tightened. However, with the increase of printing times, the screw may still loosen slightly.
¶ 2) Parameter problem
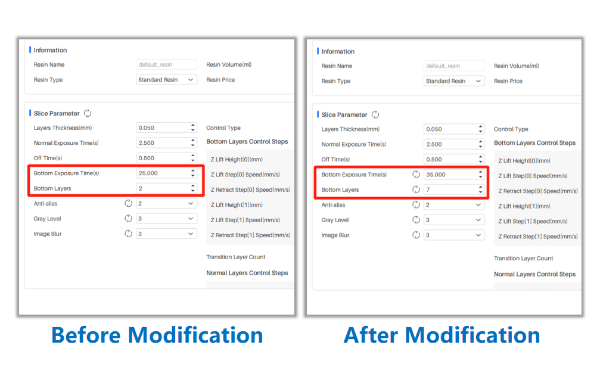
① Increase the bottom exposure time and bottom layers.
Insufficient bottom exposure time or bottom layers will result in insufficiently firm solidification of the bottom layer.
It is recommended to add 10s of bottom exposure time and 5 layers of bottom layers based on the original parameters. These two parameters will affect the adhesion of the model to the printing platform, which can be dynamically adjusted according to the size, weight, and contact area of the model with the printing platform. Larger and heavier models require a more solid bottom layer.
The following figure takes the Anycubic Photon Workshop V3.0 slicer software as an example:
② Increase Z Lift Distance.
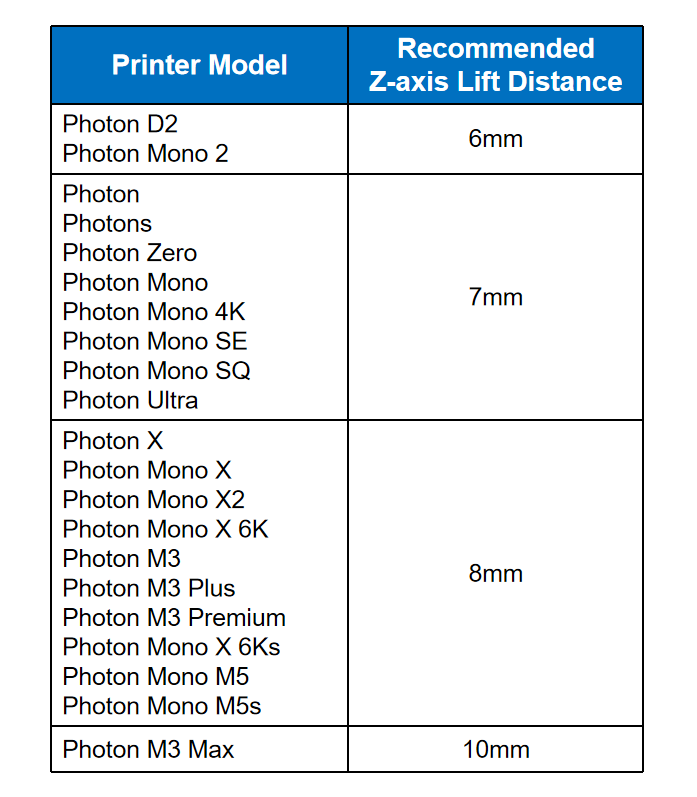
Please check the Z-axis lift distance in the printing parameters. If the lifting distance is insufficient, the newly solidified model will not be completely separated from the release film, resulting in sticking to the vat.
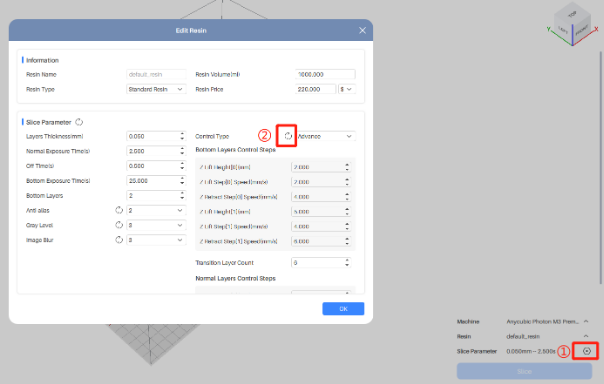
③ If the lifting speed is set too fast, there will be a momentary large pulling force between the layers of the model and between the model and the release film, which may cause cracks or even breakage of the model, leading to printing failure. It is recommended to use the default speed of the slicing software. Each model has different parameters. The following figure takes the Anycubic Photon Workshop V3.0 slicer software as an example. Click the reset button to return to the default parameter settings:
④ Support problem
Please check the support of the model to see if there is a suspended situation. If the entire model or part of the model is not supported and it is not printed on the bottom, it will also cause printing failure.
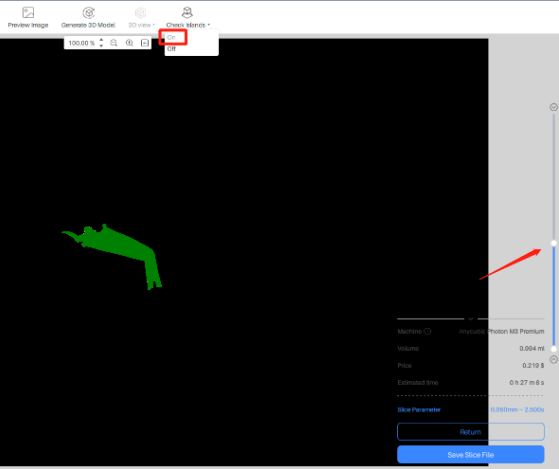
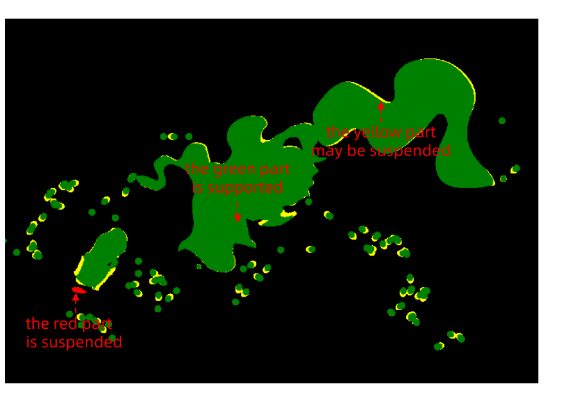
Using the Anycubic Photon Workshop V3.0 slicer software as an example, the "Check Islands" feature is enabled, and the progress bar is dragged to browse through each layer's sliced image.
The green part means there is support below; the yellow part is connected to other parts but may be suspended and may need supports; the red part is completely suspended and must be added supports.
¶ 3) Temperature influence
The best printing temperature for the resin is around 23℃. Flowability will decrease between 10-20℃, making it difficult to solidify, and it will require an increase in exposure time to compensate. Below 10℃, it will not solid.
¶ 3. Model File Issues
¶ 1)Please check if the model file is normal.
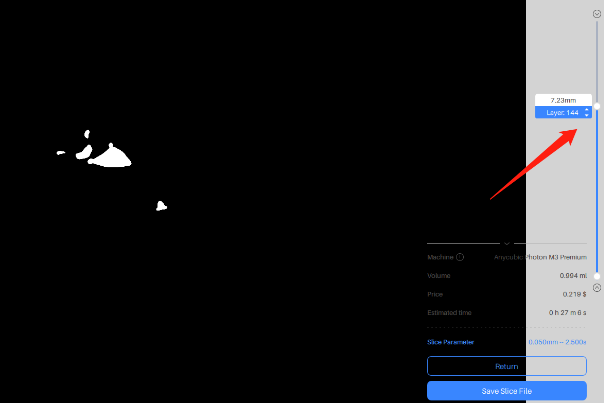
Open the sliced file on the computer, click the play button to observe the preview image of each layer of the model. You can automatically play or manually drag the progress bar to observe if the image is displayed abnormally, and whether it matches the model image.
¶ 2)Please print the official test file.
¶ 4. Resin Issue
If you have recently replaced the resin with a different type, it is recommended to consult with the resin manufacturer regarding the need for adjusting the printing parameters.