¶ 1.Tools:
S2.0 Allen key*1
S3.0 Allen key*1
¶ Operation before replacement:
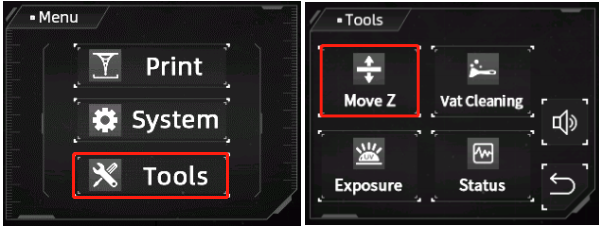
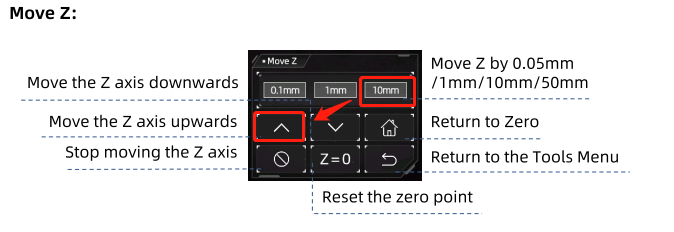
1. Please raise the printing arm to the highest position.

2. Click "Tools" - "Move Z ".

3.Select 10mm movement distance to lift the cantilever.

¶ 2. Disassembly steps:
¶ Step 1: Disassemble the base
1. Use an S2.0 Allen key to unscrew the cover fixing screws.

2. Use an S3.0 Allen key to unscrew the base fixing screws.

¶ Step 2: Disassemble the LCD Screen cable and other wire harnesses
1. Remove the tape that secures the LCD Screen cable.

2. Lift up the port buckle and take out the cable.

3. Unplug the Z-axis limit switch harness and motor harness.

4. Separate the upper bottom plate from the base.

¶ Step 3: Remove the LCD Screen
1.Remove the tape fixing the LCD Screen cable.

2.Please lift up the buckle and remove the LCD Screen cable.

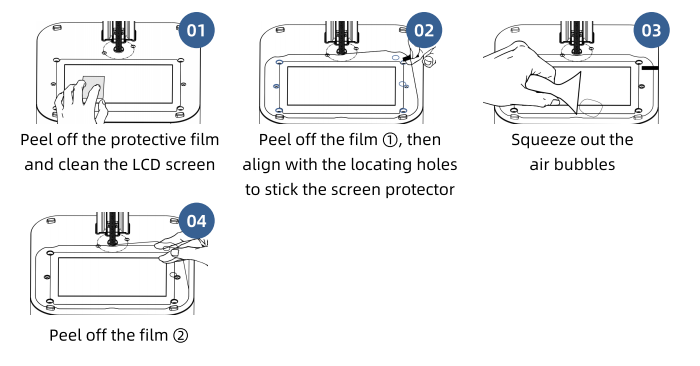
3. Remove the anti-scratch film and exposure screen sticker.

4.Remove the exposure screen and tempered glass, and push the exposure screen assembly upwards with your hands.

¶ 3.Installation Steps:
¶ Step 1: Install tempered glass
Tear off the protective films on the upper and lower sides of the tempered glass, press the edges of the tempered glass with both hands, and place the tempered glass on the bottom plate.

¶ Step 2: Install the exposure screen
1.Installing the LCD screen.

2.Please stick the LCD screen sticker on the top of the LCD screen (do not cover the LCD screen display area with the LCD screen sticker).

¶ Step 3: Install the base
1.Place the LCD Screen cable into the card slot of the base.

2.Close the upper bottom plate and base.

3.Please plug the Z-axis limit switch harness and motor harness back into the mainboard interface.

4.Please plug the LCD Screen cable back into the motherboard terminal and use tape to secure the LCD Screen cable.

5.Check that there is no abnormality in the exposure. You can use the S3.0 Allen key to tighten the base fixing screws.

6.Use an S2.0 Allen key to tighten the back cover fixing screws.

¶ 4. Check the LCD Screen condition:
¶ Step 1:Plug in power
Plug in power and turn on the machine.

¶ Step 2: Check the LCD Screen condition
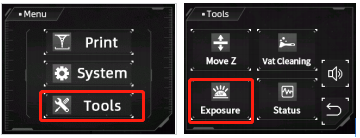
1. Check whether the UV lamp panel is working properly, click "Tools" - "Exposure ".

2.Use a piece of A4 paper and place it on top of the exposure screen. Click on the three graphics in order to see whether the exposure can be normal and there is no abnormality in the exposure screen.


¶ 5.Installing the Anti-Scratch Protective Film
After checking that there is no abnormality in the exposure screen, you can apply an anti-scratch film to protect the exposure screen.

¶ 6.Recalibrate leveling
After replacing the exposure screen, you need to recalibrate the platform.
¶ 7.Other