¶ 1. Tools
S1.5 hexagon wrench*1
S2.5 hexagon wrench*1
¶ 2. Disassembly steps:
¶ Step 1: Remove the motherboard side cover
Use an S1.5 Allen key to unscrew the screws that secure the motherboard cover.

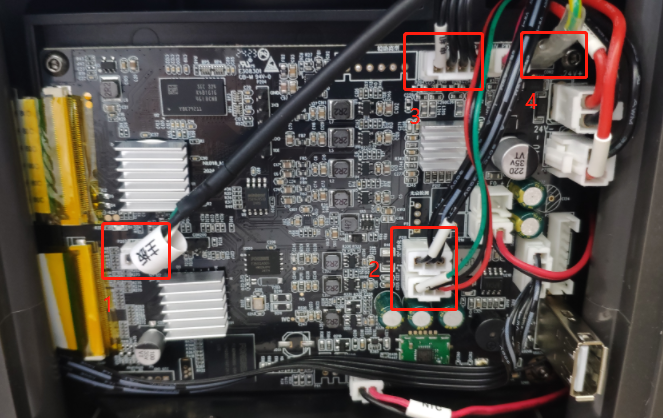
¶ Step 2: Remove the wiring harness connected to the motherboard
Please unplug the wiring harness in order according to the markings in the picture.

¶ Step 3: Remove the base fixing screws
Use an S2.5 Allen key to unscrew the base fixing screws。

¶ Step 4: Remove the LCD screen cable
Slowly move the upper bottom plate to see the exposure screen cable. Gently lift the cable buckle with your hands and take out the cable.

¶ Step 5: Remove the WiFi antenna
1. Gently open the WiFi antenna harness head (do not open it forcefully to avoid damaging the terminal).

2.WiFi antenna wire harness, take out from the side of the motherboard.

3. Use your hands to tear off the WiFi antenna attached to the base wall.

¶ 3. Installation steps:
¶ Step 1: Attach the WiFi antenna
Tear off the antenna protective paper and stick it on the inner wall of the base.

¶ Step 2: Install the WiFi antenna
1. WiFi antenna harness, pass through the side of the motherboard.

2. Align the WiFi antenna wire harness head with the motherboard terminal and press the wire harness head tightly.

¶ Step 3: Install the wiring harness
1.Please insert the wiring harness head into the mainboard in sequence according to the marks in the picture.。

2.Insert the LCD screen cable into place and press the port card tightly with your hand.。

¶ Step 4: Check WiFi status
1. Turn on the power; then return to the front of the machine and press and hold the start button for 3-4 seconds to turn on the machine。

2. Click "Cloud " - search for WiFi signal again and observe whether the signal can be received in the information bar.

Ps: If you can search for WiFi signal, you can follow step 5.
¶ Step 5: Tighten the base screws
1. Use an S2.5 Allen key to tighten the base fixing screws。

2. Use an S1.5 hexagonal wrench to tighten the screws that secure the motherboard cover.

¶ 4.Other
If the above steps do not provide assistance or if you encounter any other issues during subsequent use, we recommend that you create a support ticket.
The after-sales engineers will assist you in finding a solution to the problem(Reply time :1 working day)
Please click this link to submit your ticket:
After-sales Ticket Submission Page