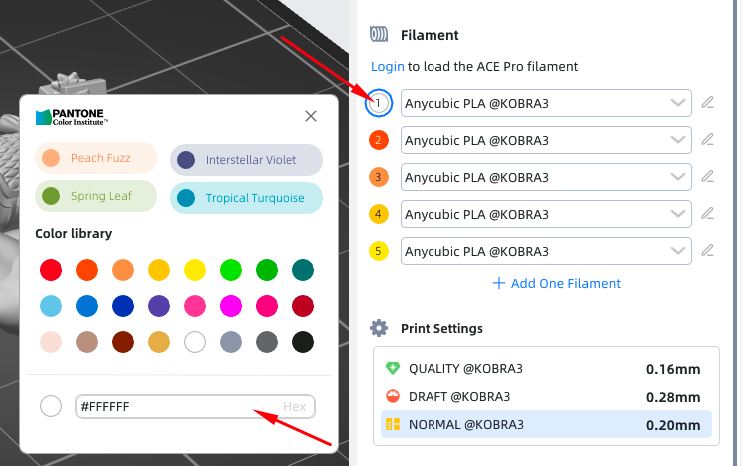
¶ 1. Edit Filaments num & Color
¶ Right
Click 'Drop-down' to change the currently selected consumable type
Click 'Add One Filament' to add a consumable, up to a maximum of 16 consumables
Click 'Edit' --> 'Remove Filament' to remove the consumable at that position, with a minimum of 1 consumable

Click on the consumable color position to change the color yourself. We have built-in Pantone co-branded colors, as well as commonly used consumable colors

¶ Sync from ACE Pro
If you have logged in and bound the machine connected to ACE PRO, click the 'Sync from ACE Pro' function to synchronize the current installed consumable type and color. At this time, the color and type used for coloring will correspond to the final printing

Click 'Sync from ACE Pro'

¶ Color Painting Page

- Click the 'Color Painting' button to open the 'Painting' window
- Click the '+' to add a color
- Click on the color position to select that color, then click again to bring up the color editing card, where you can modify the color, as well as 'Delete' that color
¶ 2. Color the Model
¶ Coloring tool

Select a multi-color printer, such as the Kobra 3
Filament num >=2 , you can increase it by using 'Add one Filament'
Select a model, at this point, the 'Coloring' function can be clicked

Currently supports a total of 7 coloring brushes, with more brushes under development
- Circle
- Sphere
- Triangle
- Shell
- Fill
- Height Range
- Gap Fill
Click 'Clear All' to clear all coloring
¶ Color by Object
When there are multiple objects in the same tray, you can modify the corresponding base color in the 'Object List'; the color comes from the types and colors created in the 'Settings' bar
The default base color is the color of the consumable at position 1

After using the 'Object List' to apply the base color to the model, you can continue to click the 'Coloring' function to apply other colors

¶ 3. Multi-color Slice
¶ Wipe Tower
When using multi-color printing, we usually turn on the wiping tower, and a separate model will appear outside the model. After the tool head changes material, there may still be some residue, and enabling the wiping tower can wipe away this waste material

You can go to the configuration manage to turn off or modify related parameters

¶ Filaments Change & Flushing
FDM prints by layer, and when there are more than two colors in the same layer, a material change operation is triggered, and the entire material change operation process is roughly as follows:
Cut off the old material line and retract it
Extrude the excess material line
Enter the new material line
Flush, after flushing is completed, continue printing with the new material line
Therefore, multi-color printing, due to the existence of material change, requires more printing time and material consumption than single-color printing

A method to reduce material change consumption is to print multiple parts at the same time in a tray, so the number of material change times required for printing 1 part and printing 10 parts at the same time is the same, so the additional time and material consumption are the same.
Flushing refers to the need to extrude an extra amount of material before entering the new material line for printing, to clean up the residual color part of the previous material, similar to a 'cleaning' process. The flushing amount is related to the two colors before and after the switch, switching from black to white, compared to switching from white to black, requires a much larger flushing amount.
¶ 4. Multi-color Remote Printing
When you connect to ACE Pro for remote printing, the current model coloring color and the machine's loaded color mapping will be automatically completed according to the matching algorithm. If you are not satisfied with the current automatic mapping color, you can manually adjust it

Therefore, the slicing process through the coloring color does not have to match the final printing color, as long as it is mapped
You can also export Gcode and use the machine to print directly. The same color mapping process is required
The color displayed by ACE Pro is determined in the workbench, and is consistent with the machine through the cloud. If it comes from the consumables with Anycubic's own Intelligent Identification Filament, the color and type will be directly obtained and cannot be modified; non-official consumables can be manually edited

Check the printing process and status in the workbench