¶ 1.Layers Thickness
Layer thickness refers to the thickness of each printed layer.
Reducing the layer thickness can improve Z-axis accuracy and allow for shorter exposure times, but may increase printing difficulty and time.
Conversely, increasing the layer thickness requires longer exposure times, which can accelerate the aging of the LCD screen.
The layers thickness parameter can be adjusted within the range of 0.01-0.15mm. Anycubic printers have a default layers thickness of 0.05mm, which is the most suitable for achieving successful prints.
When adjusting parameters, it is recommended to base adjustments on a thorough understanding of the printer's performance, with at least two bottles of resin printed for this purpose.
¶ 2.Exposure Time
Exposure time refers to the time each layer is exposed to UV light to cure the resin.
If the exposure time is too short, the model will not fully cure, resulting in poor details, model breakage, and visible layer lines.
If the exposure time is too long, the model will expand and affect the printing accuracy. This is because the resin is not completely transparent, and UV light will diffuse to the surrounding areas of the printed object.
Exposure time is affected by the resin material properties, model, temperature, and layer thickness. The exposure time for the resin provided by Anycubic is generally set to 2-3 seconds(In response to the variations in light transmission caused by different color resins, Anycubic has adjusted the formula ratio of its resins, resulting in exposure times approaching consistency across different colors of the same resin type).
As the optimal exposure time for different resins may vary, please consult the resin seller when using third-party resins.
For first-time users, you can print the test file "R_E_R_F" included on the gift USB drive to test the optimal exposure time.
Guide for Testing Optimal Exposure Time
(Ultra does not have this function).
Note: The optimal operating temperature for the resin is around 24°C, which may vary slightly depending on the resin type. If the temperature is too low, the resin's activity decreases, and the exposure time needs to be increased. If the temperature is below 10°C, the resin will not cure properly. Therefore, if you need to print in low-temperature conditions, you can try soaking the resin bottle in hot water for a period of time before printing.
¶ 3.Bottom Exposure Time
The bottom layer refers to the layer that is initially printed, not the bottom layer as seen in the model view. To ensure better adhesion of the bottom layer to the printing platform and avoid detachment or failure to adhere to the release film, additional bottom exposure time is needed.
The bottom exposure time and number of bottom layers jointly determine the adhesion of the model to the printing platform. The longer the bottom exposure time, the stronger the adhesion between the bottom layer and the platform.
If the printer uses a wire drawing platform
How to distinguish printing platforms?
, it is recommended to set the bottom exposure time to about 40s. If a laser engraving platform is used, it is recommended to set the bottom exposure time to around 25s. An excessively l
ong bottom exposure time will cause the bottom of the model to expand slightly. For higher precision requirements, it is recommended to print with inclined overhangs.
Dark resin blocks more light and requires an appropriate increase in exposure to ensure the penetration effect in the Z direction.
Note: This parameter is also affected by model size, weight, bottom contact area, and resin properties. For example, The parameter values will vary for different sizes of models.
¶ 4.Bottom Layers
The bottom layers is the number of layers that have been set with a bottom exposure time.Because the bottom exposure time is longer than the normal exposure time, it may result in the bottom layer of the model being larger than the other layers.
The bottom layers and the bottom exposure time jointly determine the adhesion of the model to the printing platform, with a higher layer count resulting in stronger adhesion. It is recommended to use around 6 layers.
Note that this parameter is also affected by factors such as the size, weight, bottom contact area of the model, and resin. If there is a significant difference in the size of the printed model, the layer count needs to be dynamically adjusted. For example, the taller the model, the more layers are required.
¶ 5.Off Time
Off time refers to the interval between the platform stopping its descent and the beginning of the next exposure after turning off the light.
It is recommended to use around 1-3s.
Increasing the off time can provide sufficient time for materials with poor fluidity to flow back. It mainly serves to allow the resin to flow back to the center of the vat and stabilize the liquid level. When the resin viscosity is high, the temperature is low, or the printing area of each layer is relatively large, the off time should be appropriately increased.
¶ 6.Z Lift Distance
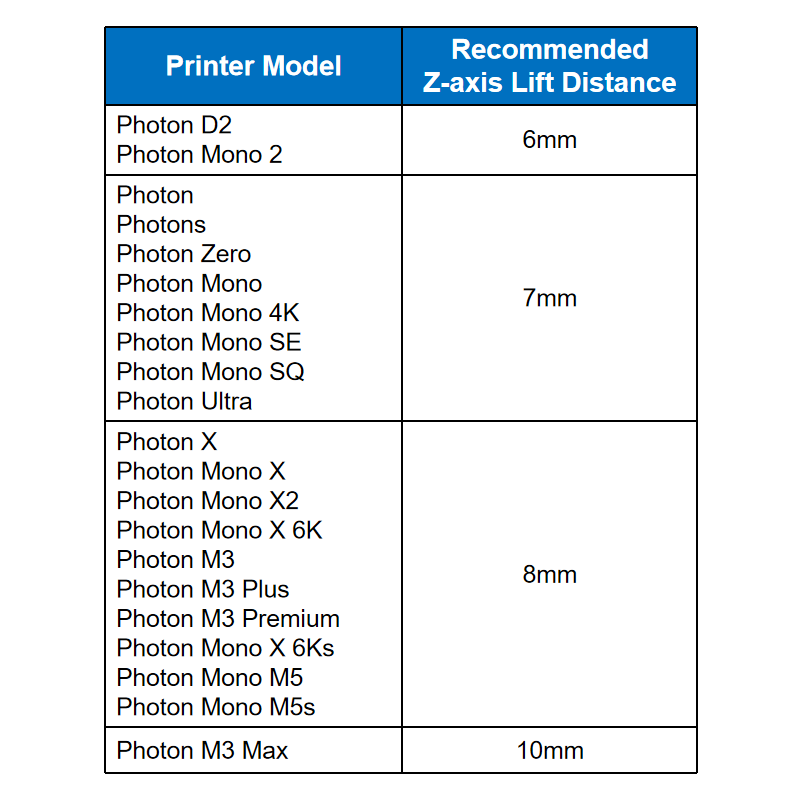
The lifting distance of the printing platform each time.
After the printing is completed, the Z-axis automatically lifts to a sufficient height for the model to completely separate from the FEP film. Reducing the lifting distance can reduce the printing time. However, due to the elasticity of the FEP film, if the lifting distance is too small, it may cause the just-formed model to be unable to separate from the FEP film. In this case, the screw of the FEP film can be tightened to reduce its elasticity. However, with an increase in the number of prints, the screw may still loosen slightly.
In general, it is recommended to use default parameters without modification.

¶ 7.Z Lift Speed
The speed at which the printing platform lifts from the vat when printing a layer.
If the Z Lift speed is excessive, it can induce instantaneous high tensile forces between model layers and between the model and the FEP film, which may result in cracking or even breakage, leading to printing failure. Conversely, if the Z Lift speed is too slow, it can prolong the printing duration.
In general, it is recommended to use default parameters without modification.
¶ 8.Z Retract Speed
The speed at which the printing platform descends.
Reducing the speed can facilitate better resin flow. High speed may induce waves in the resin liquid level, leading to model displacement and hence affecting printing quality.
In general, it is recommended to use default parameters without modification.
¶ 9.Anti-alias
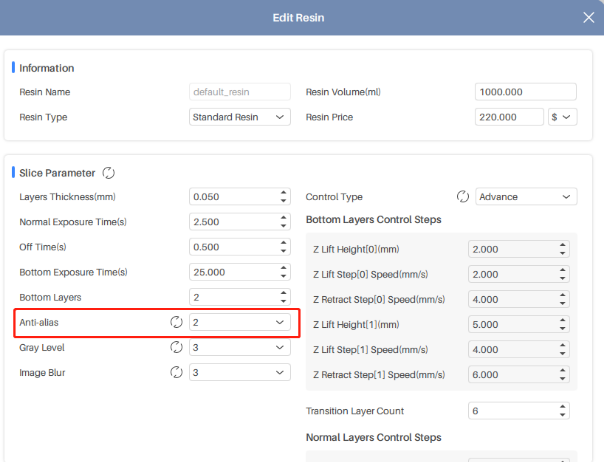
Anti-alias is a technique that smooths out the jagged edges of an image by controlling the continuity of edge exposure, resulting in a smoother surface on the model. The higher the anti-alias setting, the better the effect of eliminating jagged edges, but correspondingly, the longer the slicing time and the larger the slicing file.
The compensation of pixel patterns can be achieved through the combined usage of anti-alias, gray level, and image blur techniques.
Note: The sample image is a model printed with the Anycubic Photon. Due to recent upgrades in technology, LCD printers now use black and white screens as exposure screens, which rapidly solidify the resin at the edges of each layer while reducing the optimization effect of anti-alias.
¶ 10.Image Blur
By changing the transparency of the LCD screen (without altering the UV light intensity) to adjust the degree of solidification, the edges of the image are blurred, resulting in a more even transition. The image blur level indicates the number of layers on the XY axis that are blurred, with a higher level resulting in greater blurring.
This feature can be configured when the anti-aliasing level exceeds 1.
The compensation of pixel patterns can be achieved through the combined usage of anti-alias, gray level, and image blur techniques.


¶ 11.Gray Level
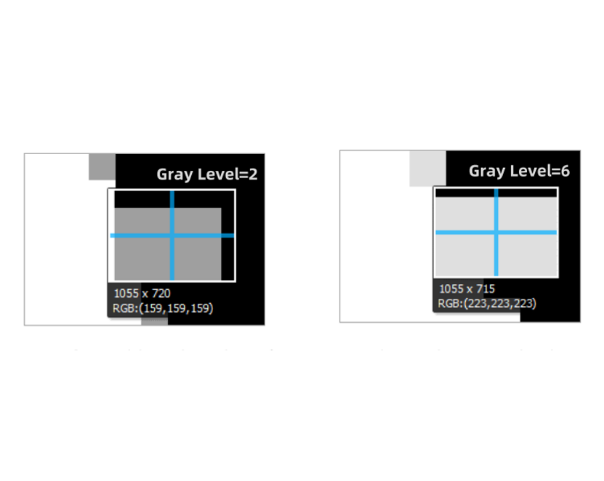
By increasing the brightness of each pixel according to the gray level, the degree of solidification at the edges can be controlled. This is an operation that is carried out after anti-alias and image blur have been set. The higher the brightness, the higher the transparency, and the less complete the solidification.
This feature can be configured when the anti-alias level exceeds 1.
The compensation of pixel patterns can be achieved through the combined usage of anti-alias, gray level, and image blur techniques.


¶ 12.Use Random Erode shell
Surface sanding is only available on certain models. Enabling this function produces a sanding effect on the surface of the model. This function can only be used when the anti-aliasing level is set to 1. It is generally not recommended to use this function, except when grayscale, anti-aliasing, and image blur have all failed.
¶ 13.Advanced Control
Under the basic control type, the bottom layers has an extended exposure time, while the lift speed, lift height, and retreat speed remain consistent with those of the normal layers.
In general, it is recommended to use default parameters without modification.
In case of a need for enhanced printing speed and quality, the control type can be switched to advanced control to enable more meticulous settings for Z-axis motion.
¶ 14.Bottom Layers Control
To set the Z lift speed, Z lift height, and Z retreat speed of the bottom layers.
¶ 15.Normal Layers Control
To set the Z lift speed, Z lift height, and Z retreat speed of the normal layers.
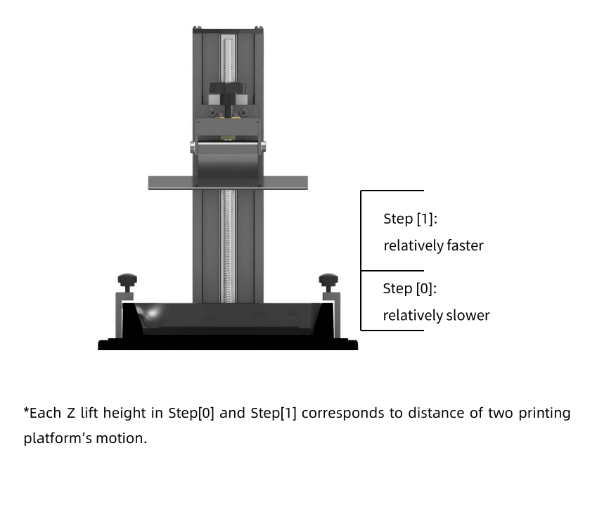
¶ 16.Transition Layer Count
The transition layers between the bottom layers and normal layers. The more the transition layers are, the longer the time transition costs.
Stage 0: The stage when printing platform is moving near the curing face. The speed of this stage is relatively slow to avoid affecting the printing.
Stage 1: The stage that printing platform is moving away from the curing face. The speed of this stage is relatively fast to shorten the printing time.

If you have further questions, we suggest you create an after-sales ticket and our After-sales engineers will help you solve the problem. (Reply time :1 working day)
Please click this link to submit your ticket:
After-sales Ticket Submission Page